Thursday, February 25, 2016

Crate Paper | Love You

This is a personal blog. All editorial content and projects are intellectual property of http://canoncreativegirl.blogspot.com/.  I do receive financial compensation and material product from Crate Paper to develop my craft posts, but all ideas and opinions are my own.


Hi everyone!  I'm stopping in today, to share a new layout with you, using the Little You collection from Crate Paper.  The soft colors in this collection are so pretty, and were just perfect of this darling photo of my niece taken shortly after she turned one.


I wanted to use several patterns in this collection, so I chose six different patterns and used my Silhouette Cameo to cut them into hexagons, and then I layered them against a white cardstock background.  


After I Finished stacking all of my hexagons and adhering them down, I used my sewing machine to add stitching to each of them.  


Wednesday, February 24, 2016

Pink Paislee | Spiral Notebook

This is a personal blog. All editorial content and projects are intellectual property of http://canoncreativegirl.blogspot.com/.  I do receive financial compensation and material product from Pink Paislee to develop my craft posts, but all ideas and opinions are my own.


Hi everyone, I hope that you are enjoying all of the lovely projects that our creative team have created so far using the spiral notebook.  I have a post to share with you today, sharing different pages that I have made within my notebook!

New Pink Paislee C'est La Vie Notebook | @gina_lideros for @pinkpaislee

New Pink Paislee C'est La Vie Notebook | @gina_lideros for @pinkpaislee


I started by dedicating the first section as my Hello Today section, this is my introductory page into 2o16, and is a section where I can jot down goals and aspirations for the year ahead.

New Pink Paislee C'est La Vie Notebook | @gina_lideros for @pinkpaislee

The Ooh La La page is a transparent page with a photo of my daughter underneath, I will use this section to jot down her growth and challenges throughout the year.  IE - she just got her very first job, so I know she has goals for saving for college and for her first car.


New Pink Paislee C'est La Vie Notebook | @gina_lideros for @pinkpaislee

Gina Lideros Notebook 3

The Friends Page - I plan on using this section of my notebook to plan future photography gigs and shoots, like the shoot that I did on this day to capture my daughter with her friends.

Gina Lideros Notebook 3 close


New Pink Paislee C'est La Vie Notebook | @gina_lideros for @pinkpaislee

The last section that I chose to document in my notebook is the "fun section" I will use this area in my notebook to plan out fun activities with my kids and their friends outside of work.

New Pink Paislee C'est La Vie Notebook | @gina_lideros for @pinkpaislee


I hope that you enjoyed my first couple of journal entries today, I cannot wait to finish my notebook and share more with you in the future!


Collection Used: C'est La Vie


Tuesday, February 23, 2016

American Crafts | DIY

This is a personal blog.  All editorial content and projects are intellectual property of http://americancrafts.typepad.com/.  I do receive financial compensation and material product from American Crafts to develop my craft posts, but all ideas and opinions are my own.


It's Home Decor week on the American Crafts blog!  I'm sharing a DIY project today sharing how I used rolled paper flowers to create this ampersand decoration.


Supplies:  Dear Lizzy Happy Place (373651) - Aruba, Dear Lizzy Happy Place (373661) - B-A-N-A-N-A-S, Dear Lizzy Happy Place (373652) - Bahama Mama, Dear Lizzy Happy Place (373641) - Be Free, Dear Lizzy Happy Place (373649) - Beachy Betsy, Dear Lizzy Happy Place (373639) - Bermuda, Dear Lizzy Happy Place (373645) - Bubblicious, Dear Lizzy Happy Place (373656) - Darling Daisy, Dear Lizzy Happy Place (373660) - La La Land, Dear Lizzy Happy Place (373644) - Lemon Berry, Dear Lizzy Happy Place (373657) - Say Cheese, Dear Lizzy Happy Place (373648) - Sunshine State, Dear Lizzy Happy Place (373642) - Swan Dive, Dear Lizzy Happy Place (373650) - Tropical Tango, Dear Lizzy Happy Place (373653) - Watermelon, Sticky Thumb (ST340275) - .5" Flat adhesive Dots, Sticky Thumb (ST340273) - Dimensional Adhesive Foam Tabs

How To: Use a die cut machine to but 3d rolled flowers out of various patterned papers.


Place rolled paper flowers into a 3d cardboard ampersand.  Use 3d foam adhesive to adhere flowers.


Finish adhering rolled flowers till ampersand is filled up.  Display and enjoy!


Monday, February 22, 2016

Crate Paper | Hello XOXO

This is a personal blog. All editorial content and projects are intellectual property of http://canoncreativegirl.blogspot.com/.  I do receive financial compensation and material product from Crate Paper to develop my craft posts, but all ideas and opinions are my own.


Hi everyone! I'm so happy to share my first project for Crate paper with you today! When I first received the new Bloom collection I couldn't wait to get started right away. There are so many pieces that I love in this collection!


I chose to make a layout using several different patterned papers from the collection. One of my favorite techniques is pattern piecing. Because I chose several bold patterns to use together, I kept the main background paper neutral so that the design would not be too overwhelming. I trimmed my papers into small strips and lined them up in a vertical fashion across the bottom of my page. Then I used my sewing machine to adhere a couple of my pieces down.


I printed a small square shaped photo and adhered to the top left hand side of my page with a small tag sticking out from behind it. I then chose lots of ephemera pieces to accent my page.


I added some gold washi and a cute little rubber charm from the collection too. Then I finished it off by stamping the date and adding some simple journaling.


Thanks for stopping by the blog today, I hope that you are enjoying the Bloom collection!


Sunday, February 21, 2016

American Crafts | Party Pieces


This is a personal blog.  All editorial content and projects are intellectual property of http://americancrafts.typepad.com/.  I do receive financial compensation and material product from American Crafts to develop my craft posts, but all ideas and opinions are my own.


Create a stunning backdrop out of paper plates.  This backdrop works great
for weddings and birthday parties.


Supplies: DIY Shop 3 (370861) Acetate Gold Foil Triangles, DIY Shop 3
(370878) Cards W/ Envelopes, Cardstock (AM71-766) Black, Sticky Thumb (ST340261) Adhesive Runner and Refill Permanent Solid, Valentines (373478) Gold Glitter/Love Washi 

Backdrop How To:
Gather about 50 paper plates, spray paint the back side of each plate with gold spray paint. Set aside to dry.  Use tape to adhere plates to your wall or background surface.  Adhere plates in a staggered overlapping pattern.  Repeat this step until you have covered your desired background area.  

Vintage Banner How To: 
Tear out pages from an old book.  Take a stack of about 4-5 pages at a time and trim into an oblong triangle shape, repeat until you have trimmed all of your pages.  Adhere glitter washi tape to the top of each banner piece.  Run the banner through the sewing
machine to stitch all pieces together.  Use scissors to trim slits into each of the banner pieces.  Each piece should look like fringe when you are finished.  Hang banner across your backdrop.

Frame How To:  Use your die cut machine to cut out a very saying to be displayed, cut title out of black cardstock and set aside.  Trim a piece of gold triangle acetate paper to the size of your desired frame.  Use adhesive to add title to acetate paper.  Set inside frame and display.


Thanks for stopping by today, I hope this has inspired you to create your own party pieces!


Friday, February 19, 2016

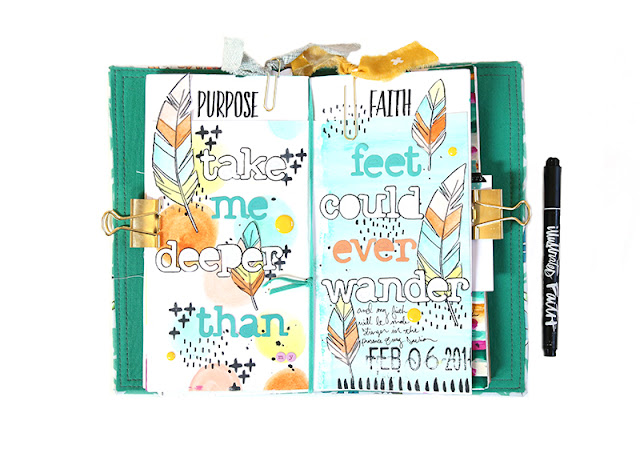
Illustrated Faith | Take Me Deeper


Hi everyone!  I hope you’re all having a great day, and I hope that you can get inspired by this worship song to take your relationship deeper with God.  I want to share a recent page from my Song Journal where I decided to let it go and fully enjoy the lyrics from the song: Oceans (Where Feet May Fail) by Hillsong United  “Take me deeper than my feet could ever wander and my faith will be made stronger in the presence of my Savior.”  It’s an incredible song with great lyrical depth.  It’s meaning to me is about stepping out in faith and trusting and depending on God more than ever.  I documented these lyrics in my song journal as a way to remember and depend and trust in him.


Supplies: Illustrated Faith: Wow God Devotional, His Love Devotional Kit by Gina Lideros, Feathers Rock Stamp Set by Kristen Fields, Emily’s Patterns 4×6 Stamp Set | Illustrated Faith by Bella Blvd: Genesis KitTyped Practice What You Peach 5×9 Stickers, Typed Practice Oh My Heavens 5×9 Stickers, Typed Practice Hey Sugar 5×9 Stickers, Mini Bless Her Heart 5×9 Stickers, .35 Precision Pen | Bella Blvd: Enamel Doodads: Pepper | StazOn Ink Pad in black | Watercolors

Monday, February 15, 2016

Elle's Studio | Cut File Highlight


Hi everyone, I would like to share with you a cut file highlight that I created for Elle's Studio this month using their exclusive February cut files paired with the Thankful collection and their February kit.


I really loved the heart in this month's cut file set. I ungrouped it from the set and placed it into a new document in my Silhouette Studio software.  I repeated the pattern several times, by using the copy + paste option.  I started by using the heart cut file at the original size and then increased it, each time I duplicated a new line on my page.


I loaded white cardstock into my machine and cut all of my heart pieces.


Next, I backed heart cut file pieces with different pattterned papers from the Joyful and Thankful collections. I arranged cut file hearts with patterned papers across a white cardstock page.  Then I used a mini stapler to staple many of the embellishments down. Next, I added bits and pieces from the February kit + extras across my page.  Next, I splashed white paint and black ink across the page.  I then printed a small wallet sized black and white photo and adhered it to the page.


I finished off my design  by using a sewing machine and white thread to sew down several of the embellishments throughout the page.  


Wednesday, February 10, 2016

Pink Paislee | Go 3D!

This is a personal blog. All editorial content and projects are intellectual property of http://canoncreativegirl.blogspot.com/.  I do receive financial compensation and material product from Pink Paislee to develop my craft posts, but all ideas and opinions are my own.


Hi everyone, I hope you have been enjoying all the creative ways our talented team has created bold titles all week.  I am sharing a layout today that has a repeating 3D title that also doubles as my background.


I have had this cut file for a long time now and was waiting for a chance to use it in a unique way.  I thought that a layout about my Valentine was the perfect fit!  To create my layout I first cut out my background using my Silhouette.  This cut file was designed by Barbara Picinich for Studio Calico.  I was designed to only cut half of each letter, so that you fold over the other half and have a 3d title!  Genius! 


Because I love patterned paper,  I cut additional X’s and O’s out of various pieces and then adhered them to each popped out piece.  I love the way the title came out but I also love the acetate and gold dipped chipboard in the C’est La Vie collection, so I added those too!  To finish I splashed ink and paint across the page, added my photo and a few other embellishments.  I hope that you enjoyed my post today and that you are inspired to create your own layout for Valentine’s Day! 


Collection Used: C’est La Vie


American Crafts | Love Notes

This is a personal blog.  All editorial content and projects are intellectual property of http://americancrafts.typepad.com/.  I do receive financial compensation and material product from American Crafts to develop my craft posts, but all ideas and opinions are my own.


These treat bags are fun and simple to make!  Fill them with love notes and special 
treats for your friends and loved ones!


Supplies: XOXO (373457) - 6X6 Paper Pad, Valentines (373455) - 6X6 Paper Pad, Whittles (373482) - Glitter And Foil Clothespins, Valentines Cards (373721) - Cards and Envelopes Kraft W/ Gold Foil, Valentines Collection (373478) - Washi Tape, Valentines Collection (373468) - Washi Tape,Valentines Collection (373474) - Washi Tape, Valentine (373502) - Rub - On Transfer Sheet, Maggie Holmes Confetti Party Kit (683715) - Crocheted Doily Garland Kit


How To: Use a paper punch to punch several hearts out of 6x6 paper pads.  Write love notes on the back of punched hearts.  Fill glassine bags with punched hearts, filler and treats.  Use a mini stapler to staple shut.  Cut four doilies in half.  Adhere half a doily to the top of each glassine bag.  Apply rub-ons to scrap pieces of white cardstock, trim around each word.  Adhere cardstock rub on pieces to top of each glassine bag.  Embellish with washi tape, and buttons.  Use a sewing machine to sew pieces down.  Finish each glassine treat bag by adhering clothespins to the top of each bag.  Trim Valentine card and adhere to the front of clip on frame.  Finish set upby hanging crocheted doily from frame using clothespins.