Monday, September 29, 2014

Inspired by....

Hi friends,
I have a layout that was on the American Crafts Blog this past week that I would love to share with you.
Pinterest is my go to source for inspiration.  Using stamps and watercolors I recreated a fun background I found on Pinterest.


My source of inspiration:

Watercolor quilt
Pin URL: http://www.pinterest.com/pin/465630048944892631/
Source: www.hopewellworkshop.com


Run Dog Run
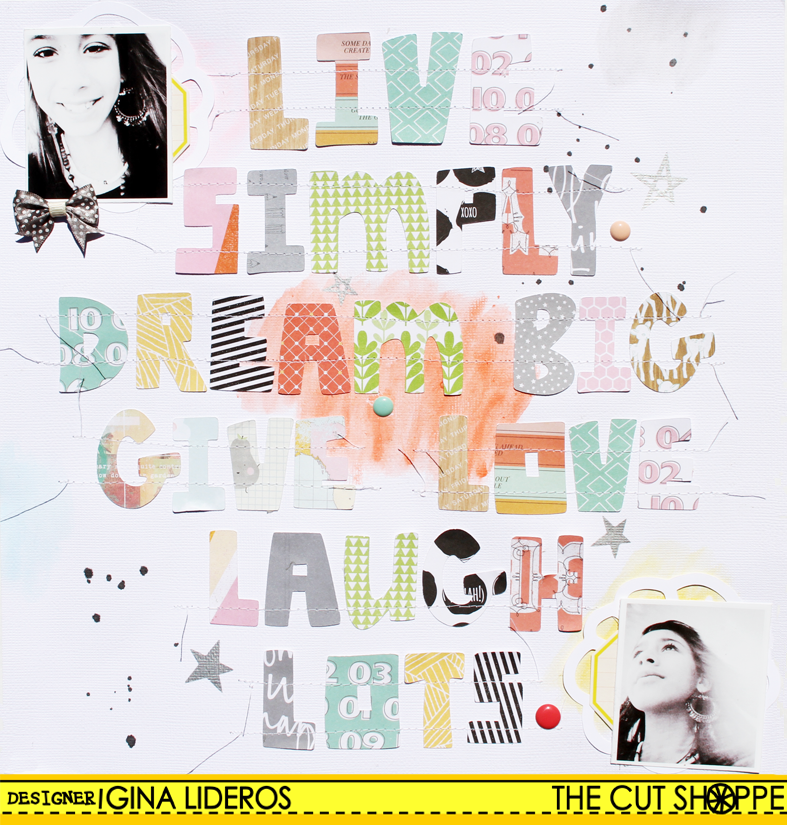
Supplies: Cardstock (AM710-81) - 12x12 White,  Cardstock (AM710-78) - 12x12 Ash, Plus One (366856) - Accompany Stamp Set, DIY (53335) Shoebox Thickers, Remarks (42482) - JFK Sticker Book, Shimelle (368173) - Ephemera Cardstock Die-Cuts, Shimelle (368145) - Herschel Paper, Shimelle (368170) -Date/Month/Year Roller Date Stamp, Knockouts (KOP63102) - Star Punch 1.5", Lucky Charm (42391) - Trinkets & Phrases/MultiChip Thickers, Mister Huey's (SC1-001) - Misting Spray Opaque White, Adhesive (AM617-13) - This To That Dispenser

how to:
Splatter white spray ink onto Ash cardstock.  Set aside to dry.  Stamp XO stamp onto white cardstock (13 times) using black dye ink, and fussy cut around the edges.  Use watercolors to color the inside of the stamped image.  Adhere 4x6 photo to bottom right hand side of layout.  Stamp chevron stamp onto left and right side of photo (make sure it overlaps onto Ash Cardstock) using white dye ink.  Use Knockouts star punch to punch a star on the top right hand side of page.  Adhere negative (from punched star) and adhere it just below.  Trim strips from Shimelle die cuts and adhere to top right hand side of page (just underneath star punch).  Use a sewing machine to stitch strips down with black thread.  Use watercolor paints to paint DIY thickers with yellow and white paint.  Adhere to page just above photo spelling out the words 'run' and 'run'.  Use small black stickers to spell out the word 'dog' in the title.  Use sewing machine to stitch black journaling lines on bottom left hand side of page.  Use a white pen to add journaling.  Stamp date stamp onto bottom left hand side of page (just under journaling).  Finish by adhering enamel dots and chevron multi chip thickers.


Thanks for stopping by today!  I'll be back later this week with more fun projects!


Friday, September 26, 2014

Live Simply

Hi,

I have a new layout to share for The Cut Shoppe today, made using two new cut files from the shop.  I have been in awe of all of the projects that I have seen lately in the scrapbooking world using the new hand cut lettering trend.  I was so excited when Ashley decided to add this adorable alphabet to the shop.

Here is the layout that I created using the new Now I Know My ABC's alpha.


Live Simply


My layout was inspired by a quote that I found on Pinterest.
How To:  I added some watercolors to my white background paper and then adhered my title using repositionable adhesive.  I used a ruler to make sure that my title was straight and then used a sewing machine to stitch the letters down.  I added a few embellishments, Funky Florals flowers and photos.  I finished by dropping a few flicks of black paint on the page.


Here are the cut files that I used on my layout:


Make sure that you stop by The Cut Shoppe and pick these fun cut files up.  These are files that you're sure to use over and over again.


Friday, September 19, 2014

5+ Photos with American Crafts

Hi Friends,

I'm back again today to share another layout that I made for the American Crafts blog.  We were given the challenge to create a layout using 5 or more photos.  When working with multiple photos on a page, I like to print them small and work them into my background. 

Play


How to: Apply drops of inky black spray mist to background paper and set aside to dry.  In Silhouette studio create 9 large squares.  Cut squares out of various pieces of patterned paper (from the Shimelle collection).  Use a paper trimmer or scissors to cut squares into 4 equal triangles.  Print off small photos and cut into triangle shapes.   Adhere triangles and photos to background paper.  Use a sewing machine to stitch down.  In Silhouette Studio cut title 'play' out of black cardstock and adhere to bottom left hand side of page.  Using thickers and tiny alphas stickers spell out the words "run, jump, play" on the bottom right hand side of layout.  Finish page by adhering stickers, wood veneer and chipboard pieces.


Shimelle (368141) - Hopper, Shimelle (368136) - Goodall, Shimelle (368137) - Crane, Shimelle (368143) - Earhart, Shimelle (368145) - Herschel, Shimelle (368146) - Resnick, Shimelle (368149) - Curie, Shimelle (368152) - Haynes,  Shimelle (368154) - Rubin, Shimelle (368160) - 6x6 Paper Pad, Shimelle (368163) - Dunbar/Gold Foil Thickers, Shimelle (368164) - Phrase & Alpha Cardstock Stickers, Shimelle (368165) - Layered Chipboard Stickers, Shimelle (368166) - Accent & Phrase Sticker Book, Mister Huey's (SC1-31064) - Misting Spray Inky Black, Adhesive (AM617-13) - This To That Dispenser, Essentials (ESS-CHP-32095) - Chipboard Shapes Stars Red & Pink, Classic Calico (CC2-WV3-31052) - Wood Veneer Shapes Tiny Stars


thanks for stopping by today! ~ 


Wednesday, September 17, 2014

Clique kits + The Cut Shoppe Blog Hop


Hi, and welcome to the Clique Kits + The Cut Shoppe Blog Hop!  We have lots of inspiration along the way, so I hope that you are able to stop by each and every blog.

I recently received the wonderful September Study Abroad kit from Clique Kits and couldn't wait to get started.  I combined the kit with some awesome cut files from The Cut Shoppe. 


For my first project, I created a layout about a subject that is very dear to my heart - coffee!


Coffee First


I simply cut the cut files out of white cardstock (heart doodles and coffee first card) and then added watercolors to them before adhering onto my page.  I love the originality and contrast that it brings to my layout.  I love that little coffee cup paperclip included in the kit, So fun!


Here are the files I used:


and my second layout features one of my favorite subjects... my dog Roxy!


Today go...

Once again, I combined the fun kit with cut files from the shop.  I also added some spray mist and droplets to my background to create a fun background for my photo.

I used 3 different cut file sets on this layout:


Next on the hop is the lovely Lee-Anne.  

Here is the whole blog hop list incase you get lost along the way

Clique Kits - http://cliquekits.wordpress.com/
Allie Stewart - http://www.magicalmesses.com/
Annelie Maddock - http://swewi.wordpress.com/
Jody Speigelhoff - http://spiegelmomscraps.com/
Gina Lideros - http://canoncreativegirl.blogspot.com/ 
Lee-Anne-Thornton - http://lee-annelovethejourney.blogspot.nl/
Gia Lau - http://www.thepaintedcrane.com/-blog
Michelle Whorwood - http://harbourgal.wordpress.com/
The Cut Shoppe - http://thecutshoppe.blogspot.com/

The Cut Shoppe is offering a 15% discount code: Code HOP17 to save 15% off of a $5 minimum purchase. Valid September 17-September 21.

Thanks for joining in on our blog hop today!  Don't forget to leave your comment on The Cut Shoppe Blog page to be eligible to win a $15 Gift Certificate to the shop, and Clique kits is also doing a fun giveaway for a Studio Tekturek paper pack and some Pinkfresh Studio goodies.  


Tuesday, September 16, 2014

La La Love You

Hi Everyone,

I hope that you are having a great week so far.  I have a fun layout to share with you today  that I recently made using a couple of awesome files from The Cut Shoppe.  When I saw this beautiful heart background, I knew right away that I just had to use it on a layout.

I added watercolor paints behind a couple of hearts and added the title to the right hand side of the layout.  While adding black spray mist to my layout, I accidentally dropped the bottle.  Oops.  But I kind of fell in love with the large blot of ink that it left behind, so I left it in.  After all, art is supposed to be subjective right? 


Here are the background files that I used:

Cross My Heart Background


Thanks for stopping by today, I hope you enjoyed my layout.  If you create a layout using The Cut Shoppe cut files, we would love to see them.  Be sure to share your projects with us by linking them up on our Facebook page.  We have a fun team up scheduled tomorrow with Clique Kits, be sure to stop by the The Cut Shoppe blog (starting at 10 am CST or 8 am PST) for your chance to win a $15 gift certificate to the shop!


Wednesday, September 10, 2014

Shimelle Canvas Tutorial


Hi Everyone,

I hope that you are having a great week so far!  I had a tutorial up on the American Crafts Blog yesterday using the new Shimelle collection.

I created this fun canvas to liven up my scrap room.  The colors and patterns in the Shimelle collection gave it such a bright and cheery look!

Supplies: Cardstock (71420 - Glitter Mustard, Cardstock (71274) - 8.5x11 Black, Shimelle (368151) - Baxter Paper, Shimelle (368137) - Crane Paper, Shimelle (368149) - Curie Paper, Shimelle (368158) - Dowdy Paper, Shimelle (368143) - Earhart Paper, Shimelle (368136) - Goodall Paper, Shimelle (368150) - Goodfield Paper, Shimelle (368138) - Grady Paper, Shimele (368157) - Granville Paper, Shimelle (368142) - Hall Paper, Shimelle (368147) - Harding Paper, Shimelle (368152) - Haynes Paper,   Shimelle (368145) - Herschel Paper, Shimelle (68141) - Hopper Paper, Shimelle (368139) - Hurley Paper, Shimelle (368148) - Jemison Paper, Shimelle (368140) - Keller Paper, Shimelle (36815) - Leavitt Paper, Shimelle (368146) - Resnick Paper, Shimelle (368155) - Swanson Paper, Shimelle (368159) - Winlock Paper, Shimelle (63210) - Silhouette Cut File - Word Banner, Cut Up (64200) - Craft Scissors 5" Blade

1.  Apply gesso generously to the front of a 12x12 canvas.


2.  Once the gesso s dry, apply watercolor paints to canvas and set aside to dry.


3. Using a punch or die cut machine cut out enough hearts to cover the front of your canvas.  I cut out roughly 4 medium shape hearts for this.


4. Line up hearts on canvas and adhere down using liquid or permanent adhesive.


5.  Use a die cut machine or template to trace a large heart onto glitter cardstock and cut out.  Adhere to front of canvas.

6.  In Silhouette Studio open up the Shimelle word banner cut file (made by American Crafts), resize to your liking and cut onto black cardstock.  Adhere to canvas.


All finished and ready to display!

Easy, cute, and a perfect addition to any room's decor!

Thanks for stopping by today!


Monday, September 8, 2014

Scrapbook Circle: Watercolor background

Hi there!  
I had a layout up on the Scrapbook Circle blog yesterday that I would like to share with you using one of my favorite techniques that I love to do: Adding watercolors to a background.  I created this layout using the September Here + There kit.

GinaLideros_YouAreLoved

I used my Silhouette Cameo to cut out a heart felt background out of white cardstock.  Then I used my watercolors and a water brush to paint on soft colors to my die cut background.  I alternated light yellow and light pink watercolors and kept the background simple to allow the beautiful glittered garden party paper from My Mind's Eye (included in the main kit) to show through.

GinaLideros_YouAreLoved_Sneak2

I also added in some tags and chipboard buttons from the September Time Flies Add On kit.

GinaLideros_YouAreLoved_sneak

Thank you for sharing my inspiration! If you create a project using this month’s kit, please share your layout on the Scrapbook Circle Facebook Page. I’d love to see what you create!