Tuesday, September 29, 2015

Scrapbook Circle | Run Jump

I'm sharing a layout today that I made with the Scrapbook Circle September Hello Hello kit and add-on.  One of my favorite techniques lately is paper folding.  I love that it is such a quick and easy way to turn plain old paper into a 3d embellishment.


I also have a weakness for cute puppies, and I happen to have three of them, so they make great scrap subjects.  I created my layout by folding the papers from the kit into squares, then I lined them up in a heart format.  I left two squares off on the right side to add interest to the page.  I embellished with stickers and pieces from the main kit and add-on.


Monday, September 28, 2015

Pink Paislee | Memory Notebook

This is a personal blog. All editorial content and projects are intellectual property of http://canoncreativegirl.blogspot.com/.  I do receive financial compensation and material product from Pink Paislee to develop my craft posts, but all ideas and opinions are my own.

When I first saw the Memorandum Memory Notebook by Pink Paislee I immediately fell in love and just couldn't wait to get started!  As a busy mom of two, anything that makes my life easier and helps keep track of my schedule is a plus!  I love the design of the notebook.  It is so easy to customize and style to fit your needs.
I use it to write down my schedule, goals, and important dates, that I need to remember throughout the month.


As activities happen, I snap photos and use my notebook as a way to document the event.  This has been a great way for me to keep track of places that we went to, and add some simple journaling.

I love the paper clips and die-cut tabs included in the office supplies pack.  They really added to my pages and helped bring them together.  Another favorite of mine are the cardstock photo frames with gold details.  I could not get enough of these, I used them throughout my notebook.


I wanted to add in an extra insert into my notebook and was so inspired by my fellow creative team member Raquel, that I decided to create my own out of the clear acetate paper with gold paper clips. Want to learn how?  Follow the steps laid out in her blog post to learn how to do this.


I also used Raquel's technique to add the love memory folder to my notebook.  It holds important notes about our recent trip to a family festival.

To create my last two pages, I first started by cutting out the "You Were Born To Be Amazing" quote from the gallery prints pack.  I wanted to place it near my daughters photo to remind her to be amazing.  I finished by adding a simple frame, washi strips and Heidi Swapp Coral Color Shine.


Overall, I just love how it all came together, and cannot wait to document more fun events!

Collection Used: Memorandum


Saturday, September 19, 2015

Pink Paislee | Today Grateful

This is a personal blog. All editorial content and projects are intellectual property of http://canoncreativegirl.blogspot.com/.  I do receive financial compensation and material product from Pink Paislee to develop my craft posts, but all ideas and opinions are my own.

The crisp change of Fall is in the air, and I am so excited for the seasons to change.  Fall is my favorite season!  Looking forward to cooler weather and everything pumpkin!

I'm sharing a fall layout today, made with the Pink Paislee Cedar Lane collection.  This collection has got to be one of my all time favorite Fall collections, I love the papers and the B sides are seriously amazing too!


I started this layout by cutting my background cut file out of white cardstock paper.  I splashed some white paint and black ink against my polka dot background paper and set aside to dry.


Then I cut out lots of fun patterned paper squares, printed and cut my photo, then added lots of embellies. 


The arrows in this collection are some of my all time favorite embellishments, just can't get enough!


Thanks for stopping by today,  I hope this layout has inspired you to get a head start on Fall crafting!


Thursday, September 17, 2015

Scrapbook Circle | A Wild Spirit

The patterned papers in Hello, Hello – September kit at Scrapbook Circle – are a fabulous mix of prints. If you flip to the “b” sides of these papers, you’ll find a variety of geometric shapes. From triangles to hexagons, diamonds to cubes, these shapes from your geometry days are inspiring our next technique challenge. Create a layout featuring geometric shapes. 


To create my layout, I started by cutting triangles and diamonds from the Crate Paper patterned papers in the kit, as well as circles and stars. Then I combined with sequins and triangle puffy stickers, the confetti of shapes down on my page to create a fun background for with photos of my daughter.


Stop by the Scrapbook Circle blog to join in on the challenge!


Wednesday, September 16, 2015

American Crafts | Instagram Album Tutorial

This is a personal blog. All editorial content and projects are intellectual property of http://americancrafts.typepad.com/.  I do receive financial compensation and material product from American Crafts to develop my craft posts, but all ideas and opinions are my own.


I love Instagram because it encompasses everyday snippets of our lives.
I put together this Instagram album for my daughter to help document
her summer memories.


Supplies: Finders Keepers (HS340259) - Minc Postcard Kit, Documentary (340198) - Thickers Noted/Cork, Documentary (340202) - Thickers Desktop/Gold Foil Puffy, Documentary (340196) - Paper Pad, Documentary (340247) - Wooden Button Shapes Assorted W/Gold Foil Accents, Documentary (340249) - Washi Tape Booklet W/Gold Foil, Documentary (340310) -Foiled Vellum Stargaze W/Gold, Documentary (340293) - Foiled Acetate 12"x12" Heart Of Gold W/Gold, Sticky Thumb (ST340275) - Flat Adhesive Dots .5", Pink Paislee Citrus Bliss (PP70661) - Instagram Chipboard Album 4"x4"

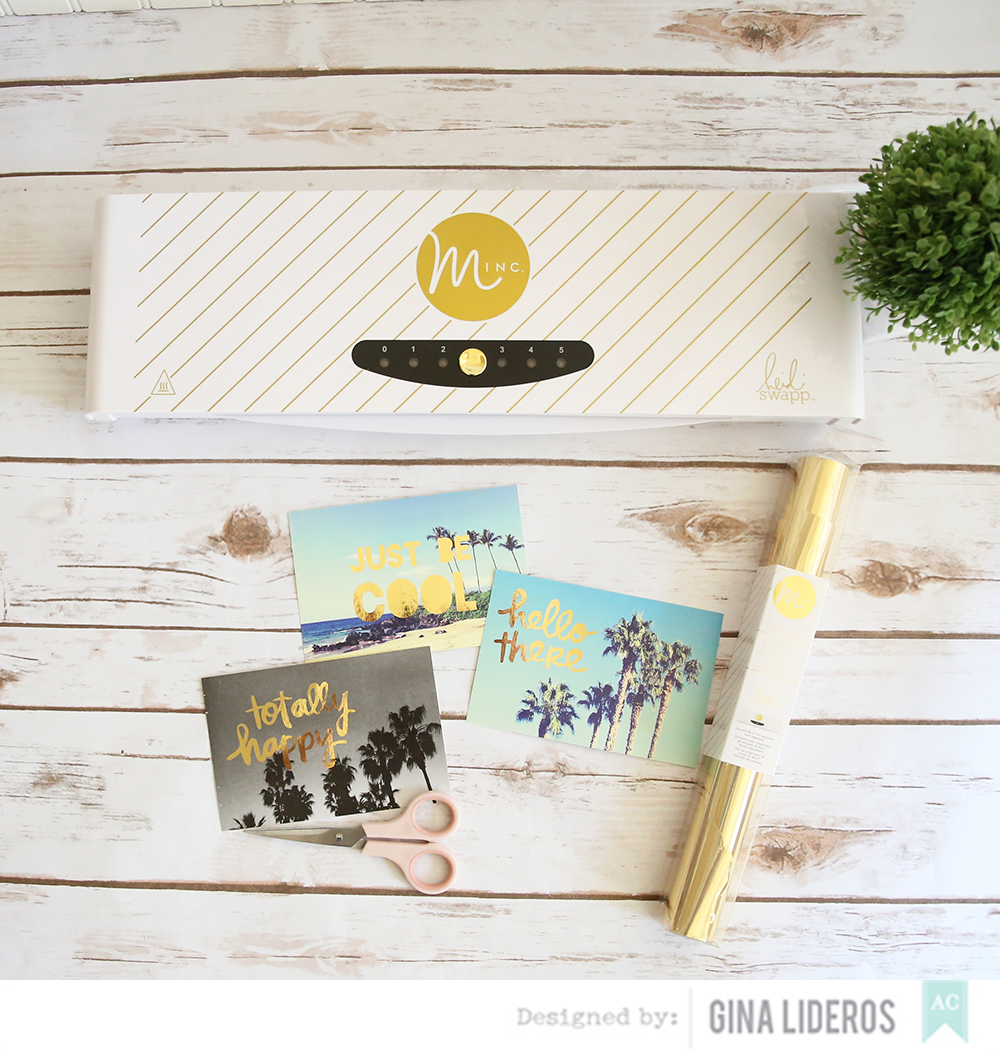
1. Gather your mini album and supplies.


2. Trim "On An Adventure" title from acetate paper, attach to album 
cover with adhesive.  Finish by adding a strip of washi tape.


3. Measure the inserts of your album.  The inserts in the Pink Paislee
Citrus Bliss Album that I'm using measure exactly 4"x4", so I trimmed
my patterned papers 4"x4".


4. Add paper and Instagram photos to album.  Embellish photo by adding
rub ons. 


5. Use the Heidi Swapp Minc Machine to add gold foil to Finders Keepers
postcards.  After foiling, trim postcards to 4"x4".


6. Add postcards to album.  Embellish photo by adding washi tape.


7. Use a tab punch to punch out tabs from various patterned papers.
Adhere tabs to each page of the album.


8. Use Sticky Thumb adhesive to adhere rub ons and wooden buttons
throughout album.


Thanks for stopping by today, I hope that my tutorial, inspires you to create your own Instagram album!


Monday, September 14, 2015

Pink Paislee | Pattern Piecing

This is a personal blog. All editorial content and projects are intellectual property of http://canoncreativegirl.blogspot.com/.  I do receive financial compensation and material product from Pink Paislee to develop my craft posts, but all ideas and opinions are my own.

Good morning!  Today on the Pink Paislee blog I am sharing  just one of the many ideas for using the Memorandum collection on a scrapbook page.  Memorandum is quickly becoming one of my new favorite collections to work with.  The patterns and embellishments go together so effortlessly.  I gathered together some of my favorite papers from the collection and embellishments.

I also added in some Mister Huey's black spray mist and some lovely gold foam Thickers from the Citrus Bliss collection.

One of my favorite techniques to do on a layout is pattern piecing.  To create this layout I first cut the Desktop Patterned Paper using a background cut file, then chose other papers from the collection to piece behind the open spaces before adhering it all down to a piece of white cardstock.

I get asked all the time what kind of adhesive I like to use when working with cut files and pattern piecing.  I like to use the American Crafts Sticky Thumb brand liquid pva glue.  It has a twist tip on it that allows me to place adhesive down in small areas.  Here is a closeup of my layout after I adhered everything down.


Collection used: Memorandum and Citrus Bliss


Friday, September 11, 2015

Scrapbook Circle | Captured

Hi everyone,

I have a new layout to share with you today using the September Hello, Hello kit from Scrapbook Circle!


Handcut letters are all the rage right now, and I just love the way they look!  I handcut my letters from papers from the main kit and then used my sewing machine and black thread to stitch down.  I used bits and pieces from the main kit and September add-on to embellish my page.


I hope you enjoyed my layout today, if you haven't already, stop by to pick up your kit today!


Tuesday, September 8, 2015

American Crafts | Favorite Creation

This is a personal blog. All editorial content and projects are intellectual property of http://americancrafts.typepad.com/.  I do receive financial compensation and material product from American Crafts to develop my craft posts, but all ideas and opinions are my own.

I chose this layout as my favorite creation because it combines two of my favorite things - watercolors and pattern piecing.  I love the way the watercolors pair so nicely with the Rise and Shine collection.


Supplies: Amy Tangerine Rise And Shine: (370013) - Claire Paper; Amy Tangerine Rise And Shine: (370004) - Ella Paper; Amy Tangerine Rise And Shine: (370006) - Emery Paper; Amy Tangerine Rise And Shine: (370009) - Emma Paper; Amy Tangerine Rise And Shine: (370002) - Kylie Paper; Amy Tangerine Rise And Shine: (370011) - Lucy Paper; Amy Tangerine Rise And Shine: (370016) - Madison Paper, Amy Tangerine Rise And Shine: (370012) - Olivia Paper; Amy Tangerine Rise And Shine: (370000) - Rachel Paper; Amy Tangerine Rise And Shine: (370017) - Samantha Paper; Amy Tangerine Rise And Shine: (370008) - Stella Paper; Amy Tangerine Rise And Shine: (370018) - Sophia Paper; Amy Tangerine Rise And Shine: (370034) - Epoxy Stickers; Amy Tangerine Rise And Shine: (370039) - Wood Veneer Tags; Amy Tangerine Rise And Shine: (3700450) - Memo Pad; Amy Tangerine Rise And Shine: (370035) - Phrase Stickers; Cardstock: (7104) - Vanilla 
How to: Use a 1" square punch to punch out pieces of assorted patterned papers and white cardstock. Use watercolor paints to apply watercolors to the punched pieces of white cardstock, set aside. Arrange punched pieces in a diamond format, use a ruler to line pieces up and adhere down. Flick drops of white paint across the page. Print a small photo and adhere to top left hand side of page and back with die cuts, note pad page, paper clip and stickers. Fussy cut a flower from overlay sheet and tuck in behind photo. Finish page by adhering wood veneer and stickers.


Thanks for checking out my favorite creation today, do you have a favorite creation that you love?