Showing posts with label Pebbles. Show all posts

Wednesday, November 19, 2014

American Crafts | Thanksgiving Place Card

Hi everyone,

This week on the American Crafts blog is all about place cards.  Place Cards are such a nice way to add a personal touch to your Thanksgiving day table.  I used sequins, foam tape and a few supplies that I already had on hand to make these one of a kind shaker cards.


Supplies:  DIY Shop (366983) - 6x6 Paper Pad, Christmas (95304) - Mini Clothespins, Autumn Crisp (366533) - Sycamore Photo Overlays, Home Made (732621) - Gold Stickers, Autumn Crisp (366518) - Walnut Lane Paper, This To That (AM617-13) - Dots Adhesive, This To That (AMF617-10) - Foam Tab Adhesive Squares


How To: Trim a piece of DIY shop note paper to 4x6.  Use a corner rounder to round edges.  Adhere Home Made gold stickers.  Use a die cut machine to cut a photo frame from light woodgrain paper.  Adhere Sycamore photo overlay to backside with adhesive.  Adhere foam squares to the back side of photo frame, fill with sequins and adhere to 4x6 card.  Use a punch or die cut machine to cut deer head and small tag from dark woodgrain paper.  Adhere deer head to center of frame using liquid adhesive.  Use a white pen to journal name onto small tag.  String tag with white twine and adhere to frame with mini clothespin.


Thursday, August 1, 2013

Altered Burlap Shadow box frame

Hi there! I hope you are having a great Thursday so far!  We just got back last night from a fun trip to Santa Cruz beach boardwalk.  We had never been there before and there was so much to do.  The kids had a blast and I will have to share pictures later this week.

I have a fun project to share with you today.  I recently received this shadow box frame in the mail from Scrapbook Trends magazine and decided to use it to create a new project for my craft room.
This was super easy and I just love how it turned out.


Altered Burlap Shadow Box Frame


The frame came with glass, which I took out and decided not to use. I covered the backing of the frame with burlap and adhered with staples. I then gathered papers from some of my favorite Pebbles inc. and punched them out using a butterfly punch from EK Success. I punched two butterflies from each pattern paper and then adhered them to the frame.

To create dimension, I simply folded the top butterflies in half before adhering them down.

This was a super easy project and I just love that it brightens up my craft room!


Wednesday, July 24, 2013

CHA Summer - Must haves


Hi there! I thought it would be fun to put a post together today of my top 10 favorite collections coming out at CHA Summer.  While  everyone is away at CHA, I will be dreaming about getting these new collections.

(Really excited about the first 4 collections because they will be in my hot little hands soon).

1.
Amy Tangerine Cut and Paste


 excited about those stitch tags and the die cut paper!

2.
Dear Lizzy Polka Dot Party

this collection has so many fun embellishments!


3.
Bella Blvd Daily Chevies and Everyday Bits
Stephanie's lines never cease to amaze me.  I am going crazy for all these large chevrons and arrows too!

4.
Bella Blvd Snapshots
so fun to see such a bright and cheerful line at the show.  This collection will be perfect for all those instagram pics that I take.


5.
Crate Paper Flea Market
I always love Maggie's lines.  Can I just have it all?

6.
Fancy Pants Collecting Moments
I especially love the Navy corrugated cardboard and resin flowers in this collection.


7.
My Mind's Eye Cut and Paste Flair
I really like all the collections coming out this year from MME.  I think Flair was my favorite but also love Rhonna's line too.

8.
Pebbles From Me to You
did you see that large stamp?  I think I need to have one!

9.
Glitz Finnley

love the colors and patterns in the Finnley collection!  So trendy!

10.
Elle's Studio Penelope
I visited the Elle's studio blog this week and was wow'ed at all of the design teams' projects that were made with this collection. 


There are many more collections that have caught my eye this year, but I tried really hard to keep it limited to my top 10.  These are some of my favorites. What are you excited for?

Sunday, July 21, 2013

My Heart is So Happy...

The other day my sweet friend Suzy West did a photo shoot of our girls. Every time that she comes to visit, we usually do a couple of photo shoots of our girls together. I loved the way these photos came out and I loved even more the way the red flower just pops. I thought it would be fun to create a layout with our new photos using some scraps I had on hand from Pebbles Inc.

My Heart is So Happy Layout


I pulled in different papers and embellishments from some of my favorite Pebbles lines. I used a combination of Seen and Noted,
Walnut Grove, Love you More and Sunnyside. I love that Pebbles lines coordinate so beautifully together.


I had a lot of fun with using color on this layout. I backed it with American Crafts cardstock and used a bold red (something I hardly do and was afraid to do) to frame my page. I love the look, the red cardstock makes the red flower that the girls are holding just pop, and it such a great use of color.


I kept the embellishments simple because I already had so many colors and patterns going on, I just cut some simple hearts using my Silhouette Cameo and grouped them in the left corner of the page.

Supplies:
Pebbles Inc.: Seen and Noted collection, Walnut Grove collection, Love you more collection, Sunnyside collection

Thanks for stopping by today!

Tuesday, June 25, 2013

Tough Stuff

Hi Everyone!
I created this layout recently using pieces that I pulled together from several of the Pebbles inc. lines. 
For those that know my son Matthew, you know what a challenge it is to get him to take photos.  I was lucky to get him to play along with me long enough to snap a few photos.  I love his expression in these photos.  He is such a goof ball!

Tough Stuff Layout:


I love the way Pebbles inc. papers and embellishments coordinate so beautifully together.  Even though the title of my page is Tough Stuff - I threw in some rosette's from American Crafts to add some dimension (Flowers go with everything right?).


supplies:
Pebbles: Seen and Noted collection, Love you more boy collection, Walnut Grove collection

Have a happy Tuesday :)


Tuesday, June 18, 2013

Playing with confetti...

Hi friends!  I have a fun layout to share today.  Lately the confetti craze has been taking over the scrapbooking world.  I recently picked up a pack of transparencies for a bargain on ebay and thought that it would be fun to make a giant slide filled with confetti. 


I cut the slide with my Silhouette cameo and then backed it with two sheets of transparency paper and sandwiched a whole lot of confetti in between and then glued the ends shut. I didn't bother to
glue the confetti in place. It moves along with the layout which I think is pretty fun.

supplies:
Pebbles: Lakeside collection, Love you more collection, Seen and Noted collection, Walnut Grove collection, Welcome Christmas collection


Wednesday, June 12, 2013

American Crafts Guest Designer projects

Hey everyone,
I am very excited to share with you my guest designer projects that I did for American Crafts


Daddy's Best Friend Layout by Gina Lideros

Tip: It wouldn't be Father's day in our house if I didn't include our 2 legged friends. This photo is special to me because Roxy is the first dog that we adopted together
as a family and she has a special place in Daddy's heart.  When working with a large
photo I found that it is easiest to keep the embellishments simple and bringing in lots
of color from different patterns compliments a black and white photo well.


Supplies:

Stargazer (PLSP-51462) - Lakeside, Road Signs (PLSP-51466) - Lakeside,
Zach (751424) - Love You More Boy, Blake (751420) - Love You More Boy,
Project (680170) DIY Shop, Cake Batter (680157) - Party Day,
Wish (680161) - Party Day,
Brads & Buttons Assortment (683135) - Party Day,
Ephemera Pack Cardstock Die-cuts (683148) -
DIY Shop, Dear Lizzy Lucky Charm
Cardstock Die-cuts (85655) - Bits, Flashcard (DIY-TH-83138) - Thickers, This To That
(AM617-13) - Adhesive,
.05 Point Black (62321) - Precision Pen


 Gone Fishing with Dad Layout by Gina Lideros


Tip: I cut this quotation bubble background with my Silhouette. It makes such a fun
and interesting background for a layout. They were
also super convenient for me
to journal in.


Coffee (AM710-49) - Cardstock, Wish (680161) - Party Day, Road Signs (PLSP-51466) - Lakeside,
Decor (680174) - DIY Shop, Ephemera Pack Cardstock Die-cuts (683148) - DIY Shop,
Dear Lizzy Lucky Charm Cardstock Die-cuts (85655) - Bits, Brads & Buttons Assortment (683135) - Party Day,
Chalkboard Stickers (732251) - Lakeside , Cardstock Stickers mini alpha (DIY-STK-83140) - DIY Shop,
DIY Shop Photo Overlays (683151), Flashcard (DIY-TH-83138) - Thickers,
This To That (AM617-13) - Adhesive


Daddy's Shoes Layout


Tip: Don't forget to look around the home to use "found items" on your layouts.
To add texture to this layout I wrapped plain white paper straws with strips
of alternating pattern papers.  I love the visual interest that it adds.

Project (680170) DIY Shop, Decor (680174)-
DIY Shop, Stargazer (PLSP-51462) - Lakeside,
Road Signs (PLSP-51466) - Lakeside, Zach (751424) - Love You More Boy, Blake (751420)
- Love You More Boy, Jacob (751423) - Love You More Boy, Photo Overlays (683151) - DIY Shop, 

Dear Lizzy Lucky Charm Cardstock Die-cuts (85655) - Bits, Brads & Buttons Assortment (683135) - Party Day ,
Lakeside Alpha Stickers (732246) - Thickers, This To That (AM617-13) - Adhesive


Thank You card


Tip: For a simple and unique card try a different shape, like the slanted rhombus I used here. 
Sky (AM710-67) - Cardstock, Zach (751424) - Love You More Boy, Blake (751420) - Love You More Boy, 
 Chalkboard (PLSP-51468) Lakeside,
POW! (751455) - Party Super Hero, Project (680170) DIY Shop,
Brads & Buttons Assortment (683135) - Party Day, Chalkboard Stickers (732251) - Lakeside,
This To That (AM617-13) - Adhesive


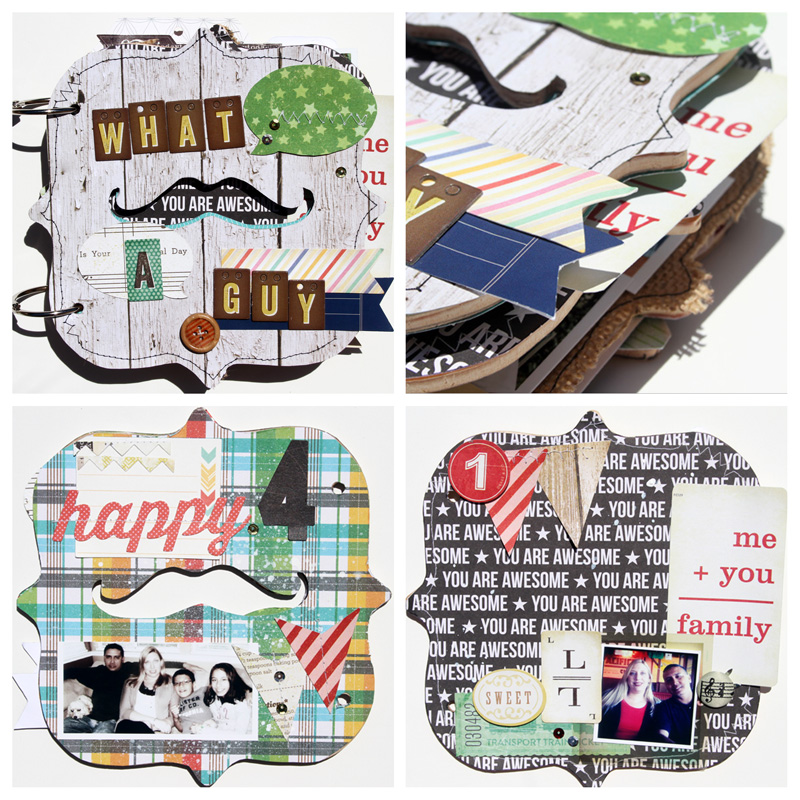
What a Guy mini album 


Tip:  I documented some of our favorite memories of my husband in this album. It will make
a great gift from the kids for Father's day.  I loved using the bright patterns from these collections to quickly put together this album.


Blake (751420) - Love You More Boy, Zach (751424) - Love You More Boy,
Chalkboard (PLSP-51468) - Lakeside, Stargazer (PLSP-51462) - Lakeside, Road Signs (PLSP-51466) - Lakeside,
Cake Batter (680157) - Party Day, Celebrate (680160) - Party Day, Wish (680161) - Party Day,
Decor (680174) - DIY Shop, Project (680170), Aperature (680198) - Maggie Holmes,Ephemera Pack Cardstock Die-cuts (683148) - DIY Shop, Dear Lizzy Lucky Charm Cardstock Die-cuts (85655)- Bits,
Brads & Buttons Assortment (683135) - Party Day, Chalkboard Stickers (732251) - Lakeside,
Cardstock Stickers mini alpha (DIY-STK-83140) - DIY Shop, Photo Overlays (683151) - DIY Shop,
Flashcard (DIY-TH-83138) - Thickers, This To That (AM617-13) - Adhesive, .05 Point Black (62321) - Precision Pen


I hope you enjoyed my American Crafts Guest Designer projects, guesting for them was a dream come true. :)


Friday, April 5, 2013

Hello My Name is Awesome

Hi everyone,
Happy Friday! I am slowly getting our household back to a routine after a long spring break.

I have a fun mini album that I created recently to share with you today. I used the new Love You More Boy collection by Pebbles Inc. I love how fun and versatile this collection is.

Hello My Name is Awesome mini album


Look for me soon in Create: Mini Books September 2013

supplies:

Pebbles:
Love You More/Boy Journaling and Quote Cards 4"X7" 24/Pad
Love You More/Boy Double-Sided Cardstock Zach
Love You More/Boy Double-Sided Cardstock Andy
Love You More/Boy Double-Sided Cardstock Ethan
Love You More/Boy Double-Sided Cardstock Matty
Love You More/Boy Double-Sided Cardstock Jacob
Love You More/Boy Double-Sided Cardstock Blake
Seen & Noted Chalkboard Stickers 3.75"X7" Sheet

Basically Bare:
Envelope mini album
My Mind's Eye:
enamel dots


Monday, February 11, 2013

Is there anything better

Hi friends,

Hope you are having a great Monday. The kids are home from school today, and we are getting ready to watch a movie and make pizza.
I have a layout to share with you that I created recently using the new Seen & Noted collection from Pebbles.

Is there anything better...
I kept my embellishments at a minimum, because I wanted the main focus to be on the friendship photo. I used an assortment of scraps to make a fun border along the right side of my layout.

Look for me soon in Scrapbook Trends August 2013


supplies:
cardstock: kraft, white (Recollections)
pattern papers, chalkboard sticker, tag, journaling card, seen & noted cards, masking tape stickers - Seen & Noted Collection (Pebbles)
die cutting machine: Silhouette Cameo (QuicKutz)
die cutting files: hearts (Karla Dudley)
adhesive: ATG (Scotch)
border punch: knockouts (American Crafts)

Monday, August 27, 2012

Maya road smile banner...


Hi friends,

I hope that your Monday is off to a great start. Mine sure is, I got the kids off to school, made it to the gym and got our grocery shopping all before 9am. Now I have the rest of the day to play in my scrap room, yay!

I have a fun project to share with you today. This week Epiphany Crafts has teamed up with Maya Road to bring you some amazing projects on their blog.

I am up today and I created a fun little banner for my scrap room


Smile Banner by Gina Lideros


Epiphany Crafts Supplies:
Epiphany Crafts: scallop 25 shape studio tool, round 25 shape studio tool, round 14 shape studio tool, scallop 25 shape bubblecaps

Maya Road: canvas banner pieces (from canvas banner album), wooden bird pieces, craft doilies, buttons
Pebbles: pattern papers, smile sticker, smile clothespins (Sunnyside collection)
Studio Calico: Mister Huey’s spray mist (mint julep)
adhesive: Beacon’s 3-in-1 quick dry glue
Brother: sewing machine
Guterman: thread

To create my banner, I first sprayed some Maya Road canvas banner pieces with spray mist:


Then I used my Epiphany Crafts scallop 25 shape studio tool, to make scallop epoxies and adhered them to my banner along with Maya Road craft doilies and Maya Road buttons.


Next, I used liquid glue to adhere Maya road wooden bird pieces.


Lastly, I punched some pieces of pattern paper using my Epiphany Crafts scallop 25 shape studio tool, round 25 shape studio tool, and round 14 shape studio tool.

Then I sewed them together in a long chain to make a stitched banner to hang from the top of my canvas banner. I then attached them with wooden clothespins.


Thanks for stopping by today, I hope you have a fabulous Monday!