Thursday, April 30, 2015

Scrapbook Circle | You're So Pretty

Hi there,
I'm sharing my very last layout for the month made with Scrapbook Circle's April Let's Do This kit.


Big letters are a hot trend in scrapbooking right now.  I used my Silhouette Cameo to cut my title from Crate paper and then adhered it to my layout.   For texture, I added drops of white paint across my page and then added a photo of my sweet niece Olivia.  To finish off my page I added bits and pieces from the This way add-on and Love It add-on.  For texture, I added drops of white paint across my page and then added a photo of my sweet niece Olivia.


Stop by the Scrapbook Circle shop to pick up this kit and to see the reveal of May's kit!


Tuesday, April 28, 2015

Pink Paislee | Fringe Letter Centerpiece

I was inspired to create my fringe letter centerpiece while shopping at the party supply store and looking at decor for my daughter’s upcoming birthday party.  I was picking up tissue paper to create tassels and was immediately drawn to the popular fringe design that I spotted on pinatas in the shop.   An idea was born, and I decided to create my own monogram centerpiece for the party using the fringe design.
@gina_lideros Letter Have It With Fringe letters @pinkpaislee #pinkpaislee #ppcitrusbliss #DIY #Homedecor
Learn to make this Monogram centerpiece DIY, perfect for a party!  This decor is easy and inexpensive and is a great way to personalize an event!
@gina_lideros Letter Have It With Fringe letters @pinkpaislee #pinkpaislee #ppcitrusbliss #DIY #Homedecor
 Monogram Fringe Letter
Supplies -
8-inch cardboard letter of your choice
1 sheet of gold metallic tissue paper
1 sheet of Pink Paislee Squeeze Citrus Bliss paper
1 sheet of Pink Paislee Citrus Citrus Bliss paper
scissors
adhesive
Trim 3 strips of  - Citrus paper, Squeeze paper and gold metallic foil paper each measuring 3″ x 12″.
Use scissors to cut fringe (slits) into each strip of paper.  Starting with the lightest color paper strip adhere to the bottom of cardboard letter using liquid adhesive, wrap around sides of letter and use scissors to trim of excess.  Continue these steps with each strip of paper, from the bottom going up in this pattern: light pink to dark pink to gold.  When the front and all sides are completed, you are done.  Use the letter as a centerpiece for a fun party setup and enjoy!
@gina_lideros Letter Have It With Fringe letters @pinkpaislee #pinkpaislee #ppcitrusbliss #DIY #Homedecor
Another item that I created for the party were these fun DIY Glitter Swizzle Sticks, and I’m going to share with you how I made them below:
DIY Glitter Swizzle Sticks
Supplies-
bamboo skewers
scissors
glitter cardstock
1-inch circle punch
adhesive
Start by punching out 1-inch circles from glitter cardstock.  Trim bamboo skewers to your desired length. Each stick will need two dots, take adhesive and spread three quarters of the way around the edge on the non-glittered side.  Attach the matching dot, then slip in the end of a bamboo skewer.  Hold dots and bamboo skewer together until dry.  Add the swizzle sticks to your party glasses.  Garnish with lemon slices, pour the drinks and enjoy!
@gina_lideros Letter Have It With Fringe letters @pinkpaislee #pinkpaislee #ppcitrusbliss #DIY #Homedecor
A fun variation on these swizzle sticks would be to use different colors of glitter cardstock paper to personalize everyone’s drink!
GinaLideros_LetterHaveIt_5
I hope that you will be inspired to create these fun projects for your next party!

Collection Used: Citrus Bliss

Monday, April 27, 2015

The Cut Shoppe and Fancy Pants Team Up!


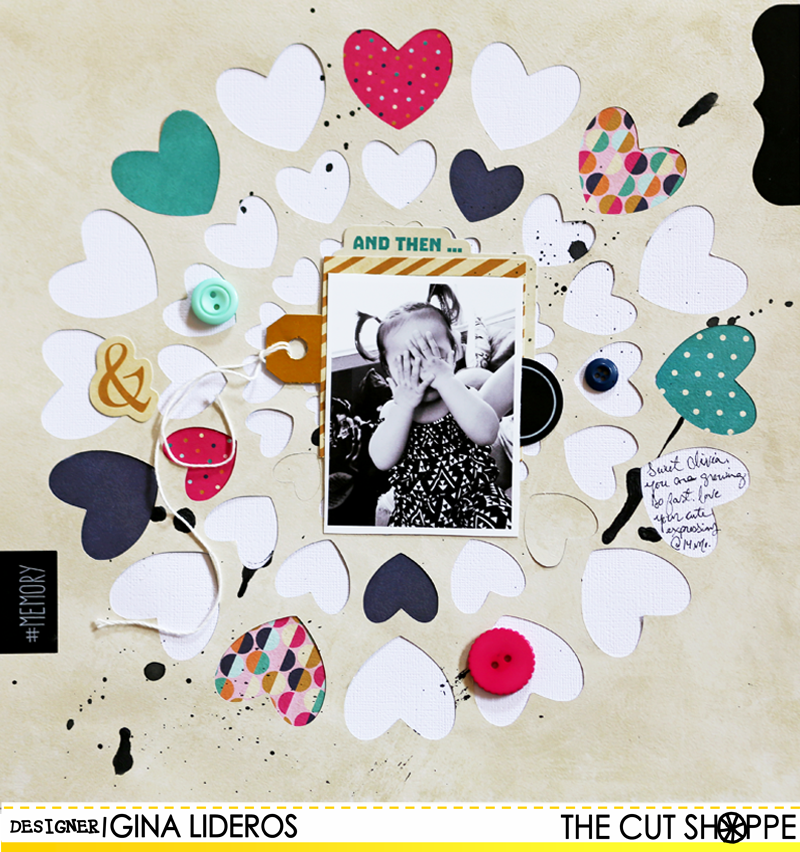
Hi everyone!  The Cut Shoppe and Fancy Pants designs is having a team up this week.  I'm first up on The Cut Shoppe blog sharing my creation!

Here is my layout that I created for the the Team Up.  I used the beautiful Fancy Pants Flutter collection, paired with the All Heart cut file from The Cut Shoppe.


How To:  Use a Silhouette Cameo to cut All Heart cut file from Change paper, back with white cardstock.  Trim small pieces of patterned paper from the Flutter collection and use to back random hearts across the page.  Flick black ink across the page.  With a black fine tipped pen journal in one heart on the right side of page.  Print a small photo and layer with frame, tab and tag, adhere to page.  Finish page by adhering buttons, die cut pieces and chalkboard stickers.


Supplies: The Cut Shoppe: All Heart; Fancy Pants: Flutter collection: Patterned Papers, Button Mix, Insta Pack, Ephemera Pack; American Crafts: White Cardstock; Studio Calico: Mister Huey's Inky Black Spray Mist


In addition to all of the inspiration you'll be seeing this week, we'll also have some great giveaways and discounts!

We are giving away some FP Goodies to one lucky winner!  All you need to do, is comment on each post this week.  We'll be choosing a random winner from all of the comments on The Cut Shoppe Blog this week.  Commenting will be open until Sunday, May 3rd, and a winner will be announced on Monday, May 4th!

And last, but not least, you can SAVE 30% during our week long team up!  Just use the Code TCSFP30 at checkout, to save 30% off of your purchase.  This discount is valid from April 27th-May 4th!


Make sure you head over to visit the Fancy Pants Blog, to see what they created today, and visit us again tomorrow to see what Allie created!


Friday, April 24, 2015

American Crafts | Recycling

This week on the American Crafts blog is all about Recycling.   I have a habit of collecting paint chips every time that I go to the hardware store.  They come in every shade of color and make a great addition to all craft projects!


Supplies: Rise And Shine (RSDS-70012) - Olivia Paper, Rise And Shine (RSDS-70009) - Emma Paper, Rise And Shine (RSDS-70004) - Ella Paper, Rise And Shine (RSDS-70001) - Chloe Paper, Rise And Shine (RSDS-70002) - Kylie Paper, Rise And Shine (RSTH-7002) - Alyx Alpha Silver Foil Thickers,Rise And Shine (RSDS-70009) - Emma Paper, Rise And Shine (370038) - Cardstock Shapes and Phrases W/Foil Accents, Cardstock (Am710-81) White Textured, This To That (AM617-12) - Adhesive


How To:  Create card from card base measuring 5x7.  Trim a piece of Olivia paper (measuring 5x7) and adhere to card base.  Use various size circle punches to punch out pieces of patterned papers and paint chips, set aside.  Use a sewing machine to adhere die cut camera to center of card.  Arrange punched circle pieces just below camera and adhere down.  Spell out title "Snap" using Alyx Alpha Silver Foil Thickers.  Finish card by flicking drops of black spray mist onto card.

Supplies: Rise And Shine (RSDS-70001) - Chloe Paper,  Rise And Shine (RSDS-70012) - Olivia Paper,  Rise And Shine (RSDS-70006) - Emery Paper, Rise And Shine (RSDS-70009) - Emma Paper, Rise And Shine (RSDS-70001) - Chloe Paper, Rise And Shine (RSTH-70027) - Grace Phrase/Gold Foil Thickers, Rise And Shine (370038) - Shapes and Phrases W/Foil Accents, Cardstock (AM710 -81) - White Textured, This To That (AM617-12) - Adhesive 
 

How To: Create card from card base measuring 4x6.  Trim a piece of Chloe paper (measuring 4x6) and adhere to card base.  Use 1" size circle punch to punch out pieces of patterned papers and paint chips.  Arrange paint chips in horizontal fashion and adhere to card. Use a banner punch to cut banner piece from Lucy Patterned paper.  Adhere die cut flower and banner piece to center of card.  Adhere thicker word "cute" to center of card just on top of flower die cut piece.  Use a sewing machine to add machine stitching to card.  Finish card by flicking drops of black spray mist onto card.


Thursday, April 16, 2015

Scrapbook Circle | Ampersands

Inspired by the ampersand die cuts you will find in the Love It add-on and This Way add-on this month at Scrapbook Circle, I created my page based around these cute little symbols.  I used papers from the April Let's Do This kit combined with my Silhouette to cut my own ampersands out of patterned paper, and then paired them with the die cuts that I got in my add-on kits.


They are so trendy and fun!  I also added drops of watercolor paint and distress paint across my page to add color.  I added a few stickers, sequins and machine stitching and boom, my layout was done!


Wednesday, April 15, 2015

Neat & Tangled and The Cut Shoppe Inspiration Week


Hi everyone,
This week The Cut Shoppe and Neat & Tangled have teamed up for a fun inspiration week.  I'm up on The Cut Shoppe's blog today sharing a layout that I created using the Happy Circles cut file and Scrap Circles Stamp set.

Friends


I wanted to use one of the cut files, as a stitching template.  I chose the Happy Circles cut file, which is one of the free Cut files, that go out in the weekly Newsletter.  Once I finished stitching the design, I added some circles punched from patterned paper, to go along with the stamped phrases from the Scrap Circles stamp set in the Neat & Tangled shop.


Supplies: The Cut Shoppe: Happy Circles cut file; Neat & Tangled: 4x6 Scrap Circles Stamp; Crafts: patterned paper, stickers, die cuts, thicker word, paper clip, precision pen, date stamp; Mister Huey's: Inky Black Spray Mist; Ink: StazOn, Hero Arts Shadow Ink; Other: embroidery thread


The Cut Shoppe is giving away a $25 credit to the Neat & Tangled Shop! All you need to do, is comment on each post this on the blog this week. Stop by!!


Tuesday, April 14, 2015

American Crafts | Pastels

It's Pastels week on the American Crafts blog, I'm sharing a fun layout with you today incorporating pastels on my layout.

Pairing watercolor paints along with light colored pieces of patterned papers are a great way to achieve a pastel look on your layout.


Supplies:  Rise And Shine (RSDS-70000) - Rachel Paper, Rise And Shine (RSDS-70001) - Chloe Paper, Rise And Shine (RSDS-70002) - Kylie Paper, Rise And Shine (RSDS-70003) - Nicole Paper, Rise And Shine (RSDS-70004) - Ella Paper, Rise And Shine (RSDS-70006) - Emery Paper, Rise And Shine (RSDS-70009) - Emma Paper, Rise And Shine (RSDS-70011) - Lucy Paper, Rise And Shine (RSDS-70012) - Olivia Paper, Rise And Shine (RSDS-70016) - Madison Paper, Rise And Shine (RSDS-70021) - Pink Foil Paper, Rise And Shine (RSTH-70027) - Thickers Grace Phrase Gold Foil , Rise And Shine (370032) - Accent & Phrase Stickers, Rise And Shine (370034) - Epoxy Stickers, Rise And Shine (370035) - Phrase Stickers, Rise And Shine (370054) - Chipboard Frames, Cardstock (Am710-81) White Textured, Precision (PP03-62311) - Pen Black, This To That (AM617-12) - Adhesive


How to: Handcut triangles from patterned papers and white cardstock papers.  Use a paintbrush to paint cardstock pieces with pastel watercolor paints, set aside to dry.  On a white cardstock background arrange triangle pieces in a scattered pattern and adhere down.  Print a small photo and adhere on top of chipboard frame, adhere to left hand side of layout.  Spell out the title "Always fun" using gold foil thickers and adhere to right hand side of page.  Use a precision black pen to add journaling to bottom left hand side of page.  Flick drops of black spray mist against the background.  Finish by adding stickers and date stamp.


Friday, April 10, 2015

Pink Paislee | Get It Done!

I love finding ways to repurpose items around the house.  I found this antique dish rack at a thrift store and decided to use it as a desk organizer.  Old dish racks make great trays to store items, because they already have slots in them.
Get it Done @pinkpaislee @gina_lideros #pinkpaislee #ppCitrusBliss #scrapbooking #filefolders #organization #repurpose
I was inspired by a few pictures I saw on Pinterest of old dish racks turned into neat desk organizers for holding file folders, scrap supplies and other items.
Get it Done @pinkpaislee @gina_lideros #pinkpaislee #ppCitrusBliss #scrapbooking #filefolders #organization #repurpose
I  used a set of file folders found in the Silhouette online store (Design ID #74112) along with 12×12 patterned papers from the Citrus Bliss collection to create my folders.
Gina Lideros Get It Done file 3
To embellish my file folders I added drops of spray mist, vellum, ephemera cardstock pieces, wood veneer pieces and chipboard stickers.
Get it Done @pinkpaislee @gina_lideros #pinkpaislee #ppCitrusBliss #scrapbooking #filefolders #organization #repurpose
I also added pieces of bunched up seam binding and machine stitching to give them a soft feminine look.
Get it Done @pinkpaislee @gina_lideros #pinkpaislee #ppCitrusBliss #scrapbooking #filefolders #organization #repurpose
These file folders are a unique way to store items, lists, bits of information and are the perfect size to store 4×6 photos.
Get it Done @pinkpaislee @gina_lideros #pinkpaislee #ppCitrusBliss #scrapbooking #filefolders #organization #repurpose
 Collection Used: Citrus Bliss
SIGGIES_Small_GINA LIDEROS
- See more at: http://www.pinkpaislee.com/?p=44179&preview=true#sthash.4e2YgDP5.dpuf

Thursday, April 9, 2015

American Crafts | Going Places


It's Shimelle week on the American Crafts blog!  I had a layout up on Monday to help kick off the week!  

The new Shimelle True Stories collection is perfect for documenting everyday moments
and is perfect for the boys in your life.  I used this collection to capture a moment about
my son and try out a fabulous trend - string art!


Supplies: Shimelle True Stories (370723) - Croissant, Shimelle True Stories (370708) Green Tea, Shimelle True Stories (370711) - Decaf, Shimelle True Stories (370701) - Latte,Shimelle True Stories (370714) - Darjeeling, Shimelle True Stories (370721) - Orange Pekoe, Shimelle True Stories (370713) - Americano, Shimelle True Stories (370724) - Macchiato, Shimelle True Stories (370710) - Cappuccino, Shimelle True Stories (3707190) - Berry Infusion, Shimelle True Stories (370722) - Cinnamon Roll, Shimelle True Stories (370717) - Frappe,    Shimelle True Stories (370736) - Enamel Dots, Shimelle True Stories (370743) - Die Cut Cardstock Shapes, Amy Tangerine Rise and Shine (370050) - Rotary Stamp, Bazzill (T7-783) - Admiral Cardstock


How To: Flick splatters of white paint across a navy blue cardstock background, set aside to dry.  Trace a large octagon shape onto cardstock background. Using a needle, embroidery thread and a ruler, poke a hole on each point of the shape and thread a line across to another point on the shape in a diagonal fashion.  For each point of the shape thread 3 lines, each going to another point.  When finished filling up the shape with threaded lines, thread the outside of the shape.  Print a small picture and trim to fit the middle shape of the design, adhere down.  Use scissors to trim various pieces of patterned papers and adhere down to different pieces inside the shape (I intentionally) left some of the pieces blank.  Use a white pen to add journaling.  Adhere cardstock die cut pieces down with 3d adhesive foam squares, place loose threads behind some of the pieces before adhering down.  Stamp a few words with white ink using Amy Tangerine word stamp.  Finish by adding button and enamel dot shapes.  


Thanks for stopping by today, I hope you enjoyed my layout!


Wednesday, April 8, 2015

American Crafts | Fine And Dandy Tutorial


I have a fun tutorial to share with you, that was on the American Crafts blog last week using the brand new Dear Lizzy Fine and Dandy collection.

Supplies: Fine And Dandy (370069) - Make A Wish Paper, Fine And Dandy (370074) - Stay Awesome Paper, Fine And Dandy (370064) - Stripey Straws Paper, Fine And Dandy (370083) - Charming Charade Paper, Fine And Dandy (370082) - Gleeful Paper, Fine And Dandy (370069) - Dies, Fine And Dandy (370098) - Cupcake Liners, Fine And Dandy (370100) - Toothpicks, Cardstock (AM714-17) Glitter Gold 


  1. Use a die cutting machine to cut your accordion banner pieces (I found my file in the Silhouette Studio store).  Accordion fold each piece along the scored lines. Fold the large bottom piece in half creating a semi-circle.

2. Fold the semi-circle base piece over to the back and tape the two ends together that meet in the center.


3.    Lay the next piece on top, aligning with the folds on the bottom layer.


 4. Lay the top piece on top aligning the folds with the two layers below.


5. Tie a string between the center fold of the bottom base and the long flat edge and tie tight. Tape all the layers together along the top edge.


6. Adhere the center circle on top. Repeat this step for each banner piece that you would like to make.  String together and hang.


7.  Accessorize with other party decorations and enjoy!


Thanks for stopping by today!


Wednesday, April 1, 2015

Pink Paislee | Vacation

The new Atlas collection from Pink Paislee is perfect for scrapping those vacation photos!
@gina_lideros @pinkpaislee #pinkpaislee #scrapbooking #ppAtlas #layout #vacation
As soon as I saw the captain foil on vellum from the Atlas collection, I just knew I'd have to use it on my layout.  I cut a large corner piece and adhered it to my layout to start my page.
@gina_lideros @pinkpaislee #pinkpaislee #scrapbooking #ppAtlas #layout #vacation

The design of this layout revolved around the photo of my daughter on the beach during our Summer vacation.  I used a frame from the 4x4 Insta kit to frame my photo.  I added pieces from the Ephemera pack, Puffy Sticker pack and Chipboard Sticker pack to embellish my page.
@gina_lideros @pinkpaislee #pinkpaislee #scrapbooking #ppAtlas #layout #vacation
 I added a few splashes of spray mist across my page, some light machine stitching and the title "Vacation" (from the cork sticker pack) to finish off my page.
@gina_lideros @pinkpaislee #pinkpaislee #scrapbooking #ppAtlas #layout #vacation
Collection Used: Atlas