Showing posts with label Amy Tangerine. Show all posts

Wednesday, March 23, 2016

American Crafts | Colorful Week

This is a personal blog.  All editorial content and projects are intellectual property of http://americancrafts.typepad.com/.  I do receive financial compensation and material product from American Crafts to develop my craft posts, but all ideas and opinions are my own.

Custom Clipboards

These colorful mini  clipboards are sure to brighten up any office space.  Use washi tape, tassels and ephemera pieces to embellish these in a snap.


How to: Cover mini clipboards with colorful patterned papers.  Trim a stack of notebook paper and clip on to each clipboard.  Hang tassels to each clipboard using twine.  Embellish the front of each notebook by adding stamps, washi tape, rub on pens and ephemera pieces


Supplies: Better Together (BTDS-73977) Knot + Bow, Better Together (BTDS-73978) - Ladies + Gentlemen, Better Together (BTDS-73981) - Salt + Pepper, Better Together (373993) - Acetate & Cardstock Ephemera, Better Together (373994) - Washi Tape Rolls Printed & Glittered, Better Together (373999) - Rub-on Pens Xo's & Donuts, Better Together (373996) - Rotary Phrase Stamp, Happy Place (373675) - Suede Tassels, Mini Clipboards (340223) - 5"x7", Mini Clipboards (340224) - 5"x7",Mini Clipboards (340225) - 5"x7", Sticky Thumb (ST340261) -  Adhesive Runner & Refill Permanent Soliid


Wednesday, March 2, 2016

American Crafts | Small Tags

This is a personal blog.  All editorial content and projects are intellectual property of http://americancrafts.typepad.com/.  I do receive financial compensation and material product from American Crafts to develop my craft posts, but all ideas and opinions are my own.


I like to keep an assortment of tags on hand that can be used for all occasions.  They also come in handy to use as gift tags.  I created these small tags using the Better Together collection from American Crafts.

Supplies: Better Together (BTDS-73962) - Each + Every, Better Together (BTDS-73961) - Sun + Moon, Better Together (BTDS-73973) - Mom + Dad, Better Together (BTDS-73976) - Yin + Yang, Better Together (BTDS-73981) - Salt + Pepper, Better Together (373984) - Black + White, Better Together (373990) - Accents & Phrases W/Gold, Better Together (373989) -  You + Me Words/Black Foam, Better Together (373994) - Washi Tape Rolls Printed & Glittered, Better Together (373993) - Ephemera, Better Together (373992) - Sticker Book, Better Together (374000) - Rub Ons W/Gold Foil, Sticky Thumb (ST340273) - White Tabs, Designer Desktop Essentials (370819) - Heart Paper Clips, Designer Desktop Essentials (370820) - Bowtie Paper Clips, Designer Desktop Essentials (370821) - Arrow Paper Clips, Designer Desktop Essentials (370823) - Jumbo Paper Clips

How to: Trim tags from patterned paper and black + white acetate paper, use string to tie each patterned paper tag to an acetate tag.  Add stickers and die cuts with foam tabs.  Add rub-ons and foam thickers to tags.  Adhere washi tape to each tag.  Use a sewing machine to add white stitching to each tag.  Finish tags by adding a paper clip to each tag.


Saturday, January 23, 2016

American Crafts | Happy Together

This is a personal blog.  All editorial content and projects are intellectual property of http://americancrafts.typepad.com/.  I do receive financial compensation and material product from American Crafts to develop my craft posts, but all ideas and opinions are my own.


The colors and patterns in the new Happy Together collection by Amy Tangerine are so vibrant and upbeat, they coordinate beautifully together.


Supplies:  Amy Tangerine Better Together (373999) Rub on Pens, Amy Tangerine Better Together (3739900) Clear Stickers, Amy Tangerine Better Together (373992) Sticker Book, Amy Tangerine Better Together (373993) Die Cut Shapes,  Amy Tangerine Better Together (373975) Him + Her Paper, Amy Tangerine Better Together (373976) Yin + Yang Paper, Amy Tangerine Better Together (373963) Stars + Stripes Paper, Amy Tangerine Better Together (373966) Push + Pull Paper, Amy Tangerine Better Together (373971) Soap + Water Paper, Amy Tangerine Better Together (373964) Sweet + Sour Paper, Amy Tangerine Better Together (373974) Cloud + Sunshine Paper, Amy Tangerine Better Together (373983) Peanut Butter + Jelly Paper, Amy Tangerine Better Together (373982) Bow + Arrow, Amy Tangerine Better Together (373980) Blogs + Coffee Paper, Amy Tangerine Better Together (373979) Fact + Fiction Paper, Amy Tangerine Better Together (373978) Ladies + Gentlemen Paper, Amy Tangerine Better Together (373977) Knot + Bow Paper, Amy Tangerine Better Together (373973) Mom + Dad Paper, Amy Tangerine Better Together (373972) Jack + Jill Paper, Amy Tangerine Better Together (373962) Each + Every Paper, Amy Tangerine Better Together (373969) Back + Forth Paper, Amy Tangerine Better Together (373967) Near + Far Paper, Amy Tangerine Better Together (373960) Hugs + Kisses Paper, Thumb (ST340276) Sticky Dots 0.5


How To: Cut heart background out of background paper using free cut file from Paige Evans available here http://americancrafts.typepad.com/studio/2015/09/instagram-layout-by-paige-evans.html  Fold each heart over and secure with sticky dots.  Cut small pieces of pattern papers and adhere behind each folded heart.  Use a paint brush and white paint
to flick paint across the page.  Set aside to dry.  Print a small black and white photo and trim into a circle.  Adhere circular photo to center of the layout.  Adhere die cut pieces and stickers throughout the page.  Finish page by adding rub on pen to the bottom 
right of page.


Friday, November 27, 2015

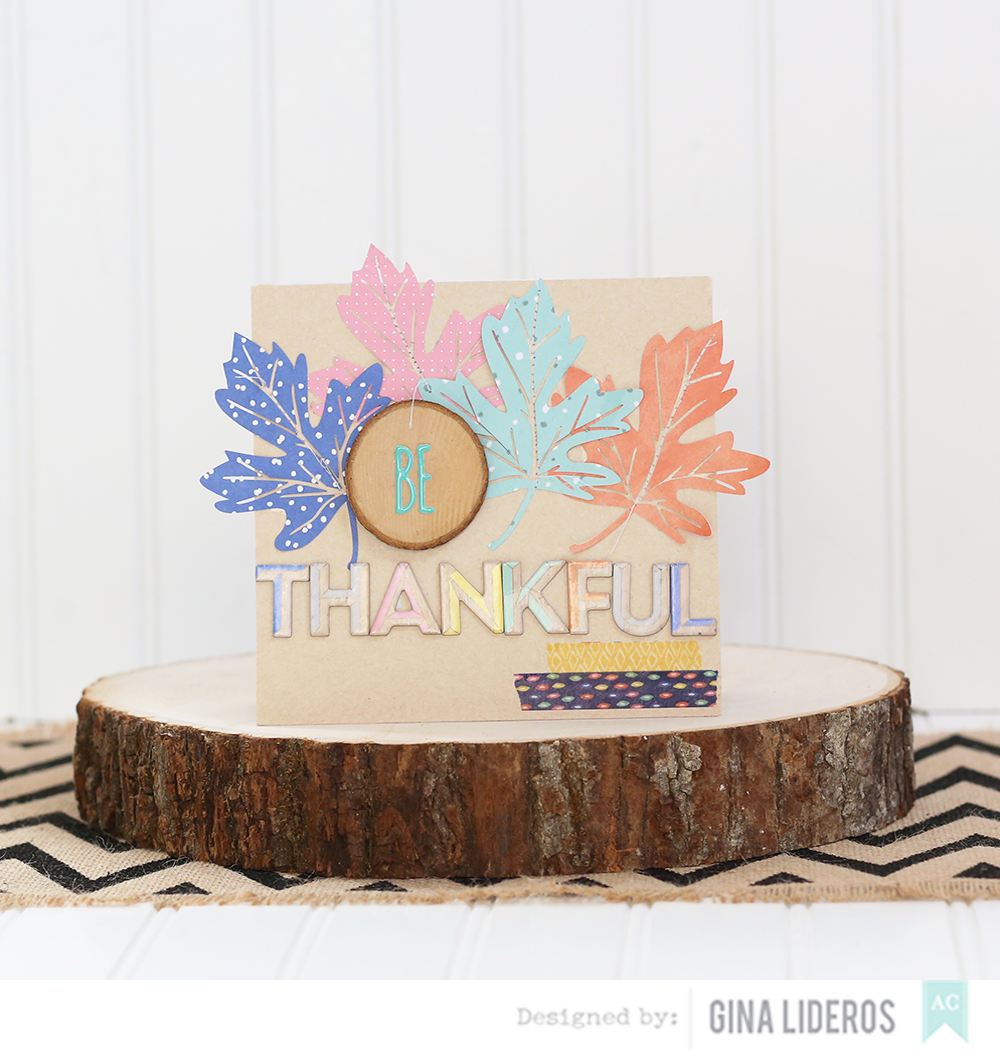
American Crafts | Thanksgiving


This is a personal blog.  All editorial content and projects are intellectual property of http://americancrafts.typepad.com/.  I do receive financial compensation and material product from American Crafts to develop my craft posts, but all ideas and opinions are my own.


Switch it up this year and make a non-traditional Thanksgiving card, by using
bright colors and embellishments from the Finders Keepers collection.


Supplies:  Finders Keepers (FKDS-40327) - Wild Goose Chase, Finders Keepers (FKDS-40322) - Pursuit, Finders Keepers (FKDS-40330) - Rainsack, Finders Keepers (FKDS-40332) - Expedition, Finders Keepers (FKTH-40232) - Memento Alpha/Green Puffy Thickers, Finders Keepers (FKTH-40233) - Follow Alpha/Multi Chipboard Thickers, Finders Keepers (340251) - Washi Tape 6 Page Booklet W/Gold Foil, Finders Keepers (340247) - Wood Slices, Cardstock (AM71-464) - Smooth Kraft

How To: Create 6"x6" card from kraft cardstock paper. Use a die cutting machine to cut leaves from patterned papers.  Overlap four die cut leaves and adhere to top of card front.  Use a sewing machine and white thread to stitch down leaves.  Adhere a wood slice to card.  Spell out the word "be" using Memento Alpha Green Puffy Thickers, and place on top of wood slice.  Spell out the word "thankful" with Alpha Multi Chipboard Thickers and adhere to card underneath leaves and wood slice.  Finish card by tearing off two strips of washi tape and adhere to bottom right hand side of card.


Tuesday, November 17, 2015

American Crafts | Titles


This is a personal blog.  All editorial content and projects are intellectual property of http://americancrafts.typepad.com/.  I do receive financial compensation and material product from American Crafts to develop my craft posts, but all ideas and opinions are my own.


I love creating creative titles for my pages.  Big titles can make a huge impact and become a statement on your page. 


Supplies: Amy Tangerine Finders Keepers (FKDS-40320) - Field Trip paper, Amy Tangerine Finders Keepers (FKDS-40322) - Pursuit Paper, Amy Tangerine Finders Keepers (FKDS-40327) - Wild Goose Chase, Amy Tangerine Finders Keepers (FKDS- 40332) - Expedition, Amy Tangerine Finders Keepers (FKDS-40334) - Clues, Amy Tangerine Finders Keepers (FKDS-40337) - Quest, Amy Tangerine Finders Keepers (FKDS-40339) - Treasure, Amy Tangerine Finders Keepers (FKSP-40333) Die-Cut Scout, Amy Tangerine Finders Keepers (FKTH-40234) - Today Phrases/White Foam Thickers Stickers, Amy Tangerine Finders Keepers (340235) - Transparent Stickers Accents & Phrases, Amy Tangerine Finders Keepers (340237) - Puffy Stickers, Amy Tangerine Finders Keepers (340243) - Cardstock & Acetate Shapes W/Foil, Amy Tangerine Finders Keepers (340246) -
Stamped Mylar Flair Embossed Gold, Amy Tangerine Finders Keepers (340247) - Wood Slices, Amy Tangerine Finders Keepers (340251) - Washi Tape Booklet W/Gold Foil, Amy Tangerine Finders Keepers (340256) - Grab Bag Assorted Embellishments, Cardstock (AM710-81) - White, Sticky Thumb (ST340261) - Adhesive Runner and Refill

How To:
Cut out title using die cutting machine on white background paper.  Paint orange watercolor paints against cut title background, set aside to dry.  Cut each word out from different pieces of patterned paper.  Adhere white cardstock die cut title piece (with orange paint) onto a second piece of white background paper and adhere down.  Place die cut title word pieces within the negative spaces and adhere down. Flick black spray mist across the page and set aside to dry.  Print a small black and white photo measuring 2.7"x2.7" back it with a slightly larger piece of cut specialty Die-Cut Scout paper and adhere down to left bottom side of layout.  Adhere a white foam "xo" sticker on top.  Use a date stamp to stamp date below the bottom left side of photo.  Place a die cut piece from cardstock & acetate shapes pack just above photo (tucking it slightly behind).  Place a stamped mylar flair embossed gold sticker right next to die cut.  On the bottom right hand side of page adhere a torn strip of washi tape.  Place a transparent sticker just above washi tape.  Adhere a small arrow sticker from grab bag just above.  Apply adhesive to the back of a wood slice.  Embellish wood slice with ampersand and camera puffy sticker and then adhere to the bottom right hand side of page.  Place a transparent arrow sticker just above.  Use a needle and white thread to handstitch around the words "like" and "love" in the title.  Finish page by adhering a large transparent floral sticker to the top right hand side of page.


I hope that I have inspired you to create your own creative title!


Tuesday, October 20, 2015

American Crafts | Fall Week


This is a personal blog. All
 editorial content and projects are intellectual property of http://americancrafts.typepad.com/.  I do receive financial compensation and material product from American Crafts to develop my craft posts, but all ideas and opinions are my own.


It's Fall week on the American Crafts blog!! I have a couple of pages that I documented our Fall memories in using the Pink Paislee Memorandum Memory Notebook.  My full post can be seen on the American Crafts blog here.

Document your fall memories in your planner.  Add in fall leaves and colors to play on the theme.


Supplies: Finders Keepers (FKTH-40232) - Memento Alpha/Green Puffy Thickers, Finders Keepers (340246) - Mylar Flair Embossed Gold, Finders Keepers (340249) Kraft Tags Embroidered, Finders Keepers (340250) - Mini Washi Tape Rolls, Finders Keepers (340251) - Washi Tape Booklet W/Gold Foil,Finders Keepers (340256) - Grab Bag Assorted Embellishments, Finders Keepers (340235) -  Accents & Phrases Transparent Stickers, Finders Keepers (340243) - Die-Cuts Cardstock & Acetate Shapes W/Foil, Finders Keepers (FKDS-40327) - Wild Goose Chase Paper, Finders Keepers (FKDS-40340) - Meant To Be Paper, DIY Shop Mini Stapler (366900) - Stapler, Precision Pen (PP05-62321) - .05 Open Stock Black , Designer Desktop Essentials (370819) - Paper Clips Heart, Designer Desktop Essentials (370821) - Paper Clips Arrow, Designer Desktop Essentials (370825) - Bowtie Jumbo Paper Clips, Pink Paislee Memorandum (310033) Memory Notebook, Pink Paislee Memorandum (310027) - Shapes Clear Sticker Book, Dear Lizzy Neopolitan (59160) - Roller Date Stamp
 
How To:  On pages 1 and 2 use the Memorandum clear sticker numbers to fill out the calendar for the month of October.  Use precision pen to document important dates and activities.  Use the alpha green puffy thickers to spell out "October" on the top left hand side.  Trim a piece of pink ikat paper (included in the grab bag) and adhere to the left side column.  Add a strip of washi to the bottom of paper.  Clip on a jumbo bowtie paper clip.  Use a die cut machine to trim a leaf die-cut out from B side of Wild Goose Chase paper.  Layer embroidered tag and die cut leaf to left hand side column.  Fussy cut leaves from Meant To Be paper.  Adhere to top of right page.  Add triangle stickers (included in the grab bag) to both calendar pages.  Add a strip of washi to the right hand side of calendar page.  Clip on a arrow paperclip to bottom right hand side of page.  On page 3, print three small square photos and adhere to page.  Add "lovely" sticker to top of first photo, spell out the words "Fall Days" using alpha green puffy stickers next to first photo.  Adhere "xoxo" banner die-cut piece using mini stapler just below first photo.  Add date stamp and journaling to center of page.  Adhere a strip of washi tape to bottom photo.  Add date stamp, journaling and mylar flair embossed sticker to bottom right hand side of page.  On page 4, adhere a photo to top left hand side of page, and a photo to bottom ride hand side of page.  Trim a piece of wood paper (included in the grab bag) and slip behind bottom photo.  Add "brilliant sticker) just below top photo.  Adhere a camera die-cut to right side of top photo.  Add date stamp just above die-cut.  Adhere heart paper clip to top right hand side of page.  Use precision pen to journal on today card (included in the die-cut pack), trim off bottom of die-cut and adhere to bottom left hand side of page.  Finish page by adding two strips of mini washi tape.


Thanks for stopping by today!  If you are documenting your fall memories in a planner, I would love to see them!


Saturday, October 10, 2015

American Crafts | Spotlight

This is a personal blog. All editorial content and projects are intellectual property of http://americancrafts.typepad.com/.  I do receive financial compensation and material product from American Crafts to develop my craft posts, but all ideas and opinions are my own.


I love quilts and patterned papers, so I combined the two on this layout
using lots of fun papers from the Finders Keepers collection.


Supplies:  Amy Tangerine Finders Keepers 12x12 Paper Pad (340230), Today Phrases (FKTH-40234) - Thickers, Puffy Stickers (340237), Stamped Mylar Flair (340246), Transparent Stickers Accents & Phrases (340235), Puffy Stickers (340237); Cardstock (AM710-81) - White, Sticky Thumb (ST340261) - Adhesive Runner and Refill Permanent Solid

How To: Use the Silhouette die cut machine to die cut a background of 5 X's out of white cardstock paper, set aside.  Use a paper trimmer to
trim pattern papers into strips, adhere pattern paper strips to your X background, use scissors to trim off excess pieces.  Cut small triangle shapes
to fill up the center of each X shape, and adhere down.  Once X background design is complete, adhere onto a 12x12 piece of white cardstock paper.
Use a sewing machine and white thread to stitch down.  Sprinkle navy ink across the page.  Print a small 6x4 photo, and trim to fit into the center of 
design, use adhesive to adhere down.  Finish page by adhering thickers, and stickers.


Tuesday, September 8, 2015

American Crafts | Favorite Creation

This is a personal blog. All editorial content and projects are intellectual property of http://americancrafts.typepad.com/.  I do receive financial compensation and material product from American Crafts to develop my craft posts, but all ideas and opinions are my own.

I chose this layout as my favorite creation because it combines two of my favorite things - watercolors and pattern piecing.  I love the way the watercolors pair so nicely with the Rise and Shine collection.


Supplies: Amy Tangerine Rise And Shine: (370013) - Claire Paper; Amy Tangerine Rise And Shine: (370004) - Ella Paper; Amy Tangerine Rise And Shine: (370006) - Emery Paper; Amy Tangerine Rise And Shine: (370009) - Emma Paper; Amy Tangerine Rise And Shine: (370002) - Kylie Paper; Amy Tangerine Rise And Shine: (370011) - Lucy Paper; Amy Tangerine Rise And Shine: (370016) - Madison Paper, Amy Tangerine Rise And Shine: (370012) - Olivia Paper; Amy Tangerine Rise And Shine: (370000) - Rachel Paper; Amy Tangerine Rise And Shine: (370017) - Samantha Paper; Amy Tangerine Rise And Shine: (370008) - Stella Paper; Amy Tangerine Rise And Shine: (370018) - Sophia Paper; Amy Tangerine Rise And Shine: (370034) - Epoxy Stickers; Amy Tangerine Rise And Shine: (370039) - Wood Veneer Tags; Amy Tangerine Rise And Shine: (3700450) - Memo Pad; Amy Tangerine Rise And Shine: (370035) - Phrase Stickers; Cardstock: (7104) - Vanilla 
How to: Use a 1" square punch to punch out pieces of assorted patterned papers and white cardstock. Use watercolor paints to apply watercolors to the punched pieces of white cardstock, set aside. Arrange punched pieces in a diamond format, use a ruler to line pieces up and adhere down. Flick drops of white paint across the page. Print a small photo and adhere to top left hand side of page and back with die cuts, note pad page, paper clip and stickers. Fussy cut a flower from overlay sheet and tuck in behind photo. Finish page by adhering wood veneer and stickers.


Thanks for checking out my favorite creation today, do you have a favorite creation that you love?


Sunday, August 30, 2015

American Crafts | Meet Me In the Sunshine

This is a personal blog. All editorial content and projects are intellectual property of http://americancrafts.typepad.com/.  I do receive financial compensation and material product from American Crafts to develop my craft posts, but all ideas and opinions are my own.


I love scrapping fun in the sun photos!  We visit the beach each year
and we always take lots of pics.  The Amy Tangerine Rise and Shine 
collection is perfect for scrapping those sunny memories!


Supplies: Amy Tangerine Rise and Shine (RSTH-70027) - Grace Phrase/ Gold Foil Thickers, Amy Tangerine Rise and Shine (370025) - 6x6 Paper Pad, Amy Tangerine Rise and Shine (370039) - Wood Veneers, Amy Tangerine Rise and Shine (370044) - Gold Paper Clips, Amy Tangerine Rise and Shine (370034)- Epoxy Shapes, Amy Tangerine Rise and Shine (370035) - Stickers Phrase, Amy Tangerine Rise and Shine (370032) - Stickers Accent & Phrase, Cardstock (AM710-81) - White, This To That (AM617-13) - Adhesive, Studio Calico (SC1-31064) - Inky Black 

How To: Use a cut file to cut out octagon shapes with centers out of various papers from the 6x6 paper pad.  Against a white cardstock background create a grid design using the octagon shapes.  Drop droplets of black ink across the page.  Print a small wallet sized photo and adhere to center octagon shape, adhere down and fasten with a paper clip.  Adhere wood veneer pieces to three of the octagon shapes.  Spell out the title "Meet Me in The Sunshine" using Grace Phrase/ Gold Foil Thickers and adhere down to page.  Embellish page with heart sticker and X stickers from the Gold Foil Thickers.  Adhere epoxy "oh yes" shape and green and gold leaf to page.  Adhere accent and phrase triangle stickers and phrase word stickers to finish off the page.


Tuesday, August 18, 2015

The Cut Shoppe | Totally Seriously Summer Fun!

Hi Everyone,
I have a new layout for to share with you that I made for The Cut Shoppe using the new Sideways Chevron 12x12 cut file.


I cut my 12x12 Sideways Chevron Background out of white cardstock paper.  Not all of the cuts, cut all the way through.  This is because I need a new blade, but I loved the look.  I decided to leave a lot of the pieces that did not cut all the way through on this page, to give it a sense of white balance.  I popped out a few pieces and then layered a piece of Finder's Keepers Patterned Paper behind it.  I then printed my small photo and added embellishments, stitching, stamping and the title.


This layout came together quickly, and I love the look.  Here is the background cut file that I used:


Sideways Chevron 12x12 Cut File


Thanks for stopping by today, I hope you enjoyed my layout.  If you make a layout using cut files from the shop, we would love for you to share it with us on The Cut Shoppe's Facebook Page!


Tuesday, August 11, 2015

American Crafts | Finder's Keepers

This is a personal blog. All editorial content and projects are intellectual property of http://canoncreativegirl.blogspot.com/.  I do receive financial compensation and material product from American Crafts to develop my craft posts, but all ideas and opinions are my own.


The new Finder's Keeper's collection by American Craft's is so playful and happy.  The combination of sweet icons, bold patterned papers and embellishments bring a youthful look to my page.


Supplies: Finder's Keepers (340320) Field Trip, Finder's Keepers (340322) Pursuit, Finder's Keepers (340323) - Keen, Finder's Keepers (340324) - Bright Eyes, Finder's Keepers (340325) - Explore, Finder's Keepers (340326) - Roundabout, Finder's Keepers (340327) - Wild Goose Chase, Finder's Keepers (340329) - Token, Finder's Keepers (340330) - Ransack, Finder's Keepers (340332) - Expedition, Finder's Keepers (340334) - Clues, Finder's Keepers (340335) - Dreamcatcher, Finder's Keepers (340337) - Quest, Finder's Keepers (340339) - Treasure, Finder's Keepers (340340) - Meant To Be, Finder's Keepers (340341) - Magnify, Finder's Keepers (340342) - Compass, Finder's Keepers (340343) - Seeker, Finder's Keepers (340235) - Clear Sticker Sheet, Finder's Keepers (340234) - Thickers Today, Finder's Keepers (340237) - Puffy Stickers, Finder's Keepers (340242) - Rubber Words, Finder's Keepers (340243) - Die Cut Shapes, Finder's Keepers (340248) - Rubber Words/Shapes, Finder's Keepers (340251) - Washi Book, 


How To:

Cut patterned papers into 2 1/2" x 2 1/2" inch squares, Use a bone folder to fold in each end of the square.  Repeat this step until all of the squares are folded.  Arrange folded squares onto a 12x12 white cardstock sheet of paper.  Line them up in horizontal lines of four, use adhesive to adhere down.  Print a small black and white photo, trim into a diamond shape and adhere to page.  Adhere "We Are Better Together" die cut shape to page, right beside photo.  Adhere three more folded squares to the top left hand side of page to complete design.  Flick small drops of black spray mist across page, set aside to dry.  Adhere clear arrow sticker and two small strips of washi tape to top right hand side of page.  Use a sewing machine and white thread to stitch down.  Use the sewing machine to add a couple of stitches to a few of the folded squares.  Adhere "XO" foam thicker word to page on left hand side.  Adhere die cut arrow shape to page just below thicker word.  Adhere "hello" rubber word to bottom right hand side of page on top of folded squares.  Adhere a small blue triangle die cut and puffy sticker just below word. Adhere a small gray circle rubber embellishment to middle of design on top of a folded square.  Finish by adhering pink acetate star to the top right of design.


Thanks for looking today!


Saturday, May 30, 2015

American Crafts | Flowers


Hi everyone,

This week on the American Crafts blog is Flowers week.  I had a card that was on the blog earlier this week featuring flowers, made with the Amy Tangerine Rise and Shine collection.
Create instant flowers for your projects using metal dies.  You can layer them together for a big impact.


Supplies: Dear Lizzy Serendipity (369224) - dies, Dear Lizzy Serendipity (369220) - Watercolor Words,  Amy Tangerine Rise And Shine (370034) Epoxy Stickers, Amy Tangerine Rise And Shine (370044) - Paper Clips Gold, Amy Tangerine Rise And Shine (370025) - 6"x6" Paper Pad, Cardstock (AM710-81) - White


How To: Create a 5"x5" card base and fold in half.  Using the Dear Lizzy Serendipity dies, die cut flowers from different pieces of pattern paper included in the 6"x6" Paper Pad.  Curl up edges of flowers and layer them onto the card.  With a sewing machine add messy stitching to some of the flowers.  Flick black spray mist across the card.  Adhere "Hello" watercolor word to the center of card using liquid adhesive.  Finish by embellishing card with epoxy sticker and paper clip.