Showing posts with label pink paislee Christmas. Show all posts

Sunday, December 6, 2015

Pink Paislee | Christmas Countdown Day 3

This is a personal blog. All editorial content and projects are intellectual property of http://canoncreativegirl.blogspot.com/.  I do receive financial compensation and material product from Pink Paislee to develop my craft posts, but all ideas and opinions are my own.

Hi everyone,  I hope that you have enjoyed following along so far with the Christmas Countdown series on the Pink Paislee blog.  I would like to share with you today, how I am documenting day 3 on our Christmas countdown.


Each year, I like to make a batch of Peppermint Bark for family and friends and deliver them in a festive tin.  I’m not much of a baker, but I love Peppermint Bark and found a recipe on the internet that worked for me.  I printed a couple of photos of my festive treat and added it to my pages for day 3.


I wanted to make my own embellishments that were as fancy as my treat, so I created a 3d snowflake by using my die cut machine.  I simply cut the same image out several times and then layered it onto my page.  I placed a jumbo Yuletide number 3 on top of my 3d snowflake to document the day.

On my second page, I used a score board to create 3d stars and then intertwined them with embellishments from the ephemera pack and foiled canvas stars pack.  I also added a few pieces of kraft colored filler strips (from the wrapping paper section at my local store) to help give my design dimension.

Next, I decided to dress up one of the dividers within my notebook.  To do this, first I trimmed a piece of double-sided Countdown paper to measure 6 x 8 3/4″.  I used my Heidi Swapp Memory Dex punch to do this.  For a great tutorial on how to do this, please visit Raquel’s post here.  Next, I trimmed a spare piece of transparency paper measuring 6x 7 3/4″.  I placed the Yuletide jumbo letters inside my pocket spelling the word “Xmas”.

Next, I filled my pocket with sequins and used a sewing machine to stitch the ends closed.  When you shake the transparency pocket the word  “Xmas” shows through.  On the adjacent side I flicked a bit of Heidi Swapp Gold Color Shine across the page, and added a few sequins and ephemera and sticker pieces to complete my page.

If you are using the Yuletide Document December Journal to document your December, we would love to see it!  Share it with us on our Facebook page or tag us on Instagram using @pinkpaislee or the #pinkpaisleeYuletide hashtag!


Friday, November 27, 2015

Yuletide Paper Star Ornaments

This is a personal blog. All editorial content and projects are intellectual property of http://canoncreativegirl.blogspot.com/.  I do receive financial compensation and material product from Pink Paislee to develop my craft posts, but all ideas and opinions are my own.


Who doesn’t like an easy to make paper star?  These multi dimensional stars are really easy to make, all you need is a few supplies to get started.  I used papers and embellishments from the Pink Paislee Yuletide collection to create mine.  They make cute decorations that can be used for all sorts of decorating.


Materials:
- patterned paper or other square paper (mine was approx. 6″)
- pencil
- scissors
- glue
- string to hang hem

How to:
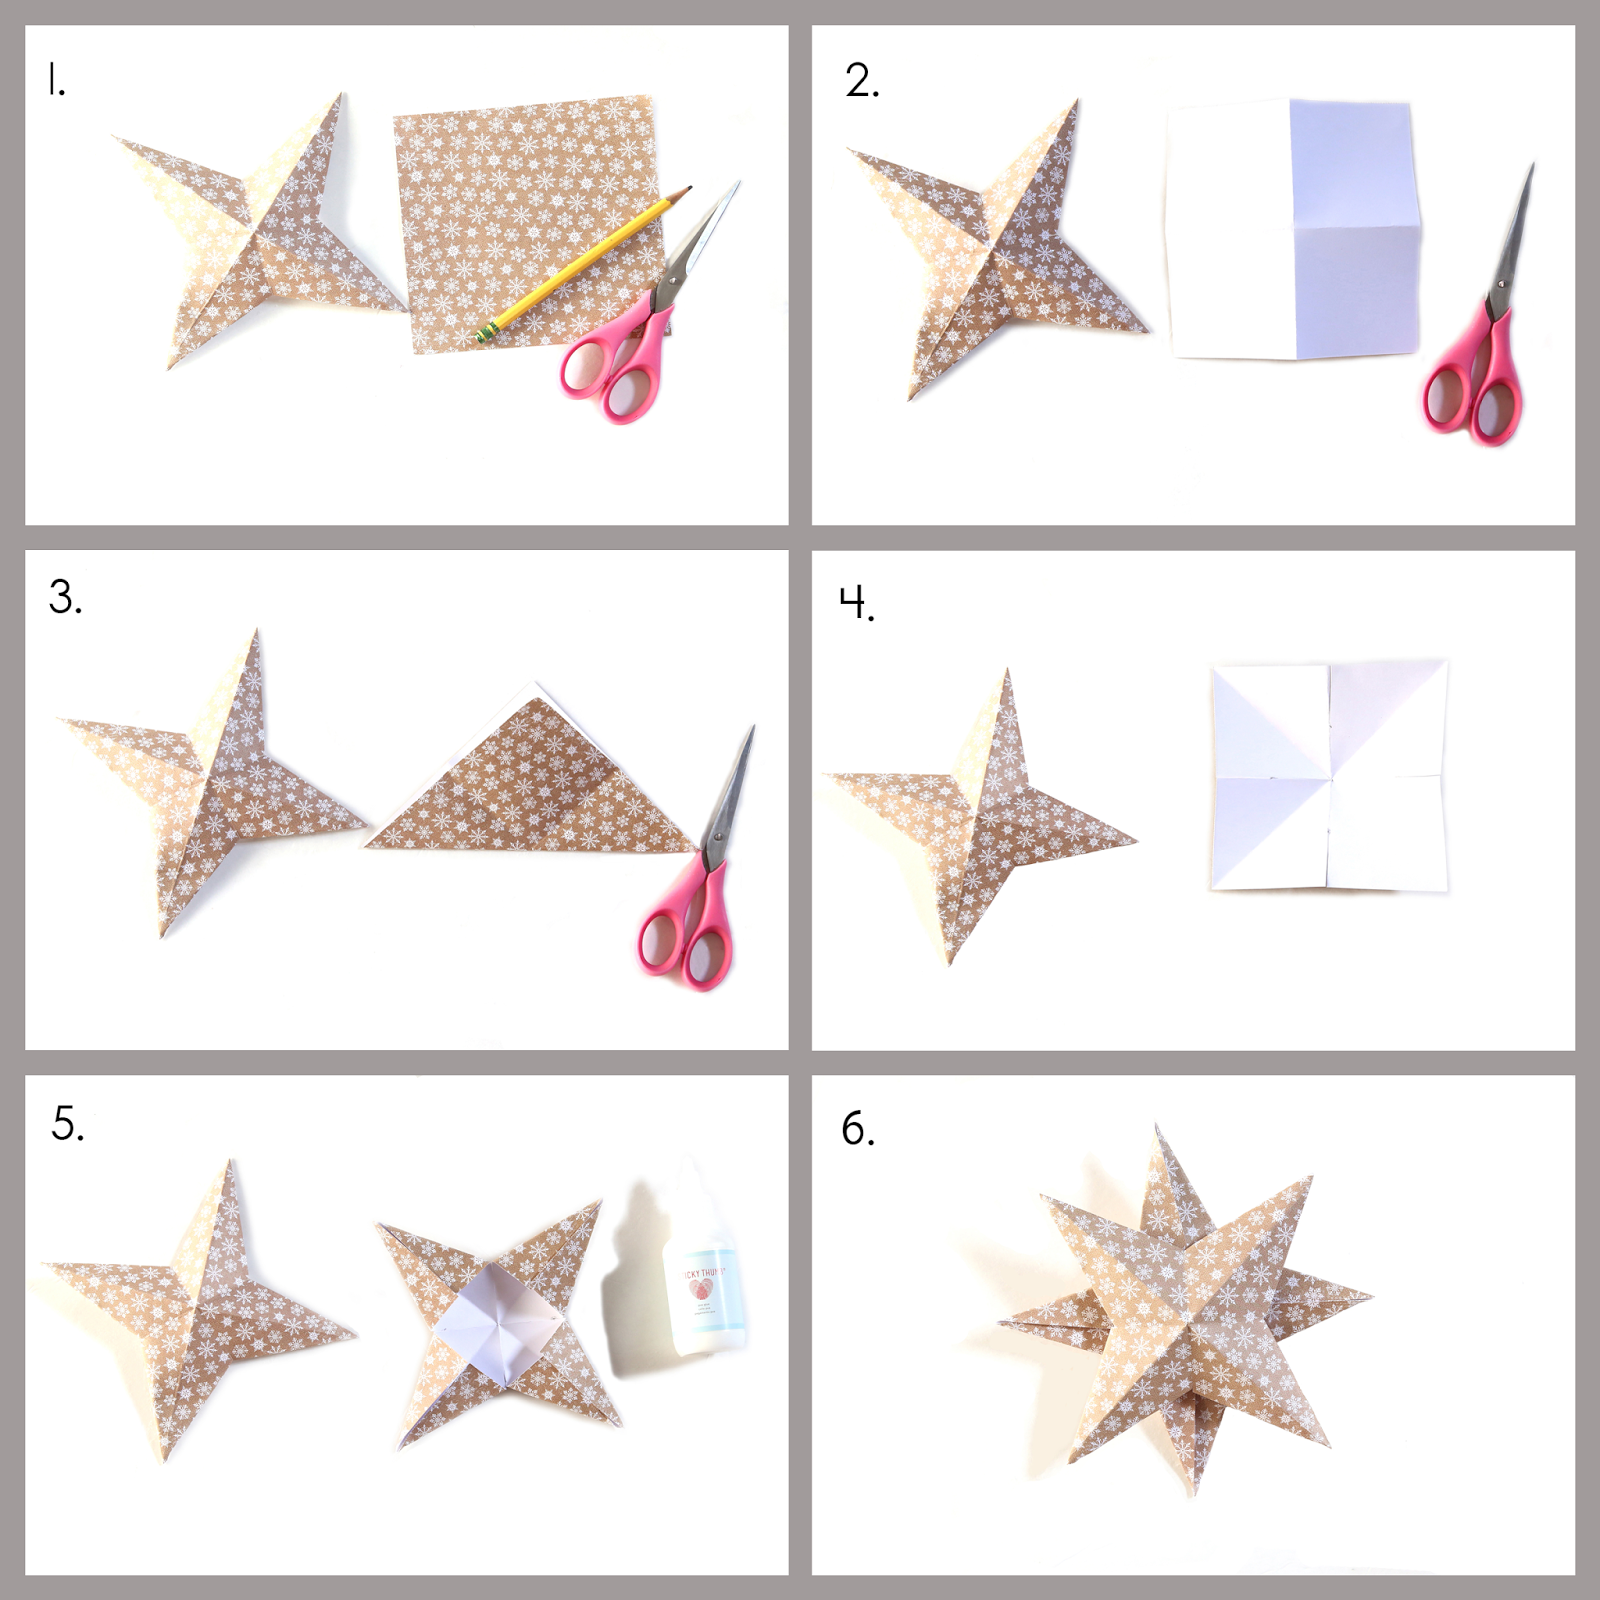
Just follow the directions in the picture tutorial below.

1.  Gather materials.
2. Turn the paper over and fold into 4 quarters as shown in picture 2.
3. Turn the paper back over and fold diagonally in both directions.
4. Use a pencil to mark the middle of the folds that are creased towards you.  These are the horizontal and vertical creases that you made in step 2.  Cut with scissors from the edge to your pencil mark on all four sides.
5. Fold sides down and adhere with liquid glue.
6. One side is ready, but you need one more to complete the star.  Repeat the previous steps to make another star.  Place glue on the backsides of two stars and adhere together.  When the stars are done the pointed 3d sides should be facing out on both sides.

You can do variations on these stars, by switching up patterned paper, or switching up sizes.

I dressed my stars up by adding tags, canvas stars, and ephemera pieces from the Yuletide collection. 


  The little crinkled pieces of paper, I picked up in the gift wrapping section.  I was originally looking for gold or silver, but I love the way the kraft filler strips accentuate the stars.


Since I don't have my Christmas tree up yet, I pinned my paper star ornaments onto a frame using burlap string and clothespins.  I also filled a little basket with extra ones.


You could easily add these to a tree with clips, hooks or use a hole punch and thread to create loops to hang them with.