Showing posts with label DIY Crafts. Show all posts

Thursday, June 18, 2015

Heidi Swapp Minc project


Hi everyone!  I recently picked up the new Minc machine by Heidi Swapp and couldn't wait to dive in!  


 I instantly started playing and fell in love right away with this machine!  I found it to be very user friendly and fun to play with!  


Once I started playing, I found it  hard to stop.  I just wanted to foil all the things!


I recently picked up this antique looking burlap frame and thought that the Minc embellishments would look awesome pinned to it!


I absolutely adore the 3D Minc butterflies, I foiled them in gold, mint, and light pink, and then stitched them together using my sewing machine!


I added a photo of my daughter and foiled the letter "K" for her initial using gold foil.


I even managed to sneak in a xoxo clear frame from the Pink Paislee Citrus Bliss Insta Kit, behind her photo.


I layered some of the pieces, added an antique flower and pinned my pieces onto my frame using pearl stick pins.  


This frame will make a great addition to her room, or I might just keep it for myself because I love it that much!  If you haven't picked up a Heidi Swapp Minc machine yet, run don't walk.  Joann's has them on sale right now for 25% off!  


Monday, March 9, 2015

Pink Paislee | I'm So Lucky

Hi friends!  I'm so happy to share my first project on the Pink Paislee blog today, using the new Citrus Bliss collection!  When decorating for Saint Patrick's Day, I like to keep the colors of my decor, soft and muted to match the other pieces around my house.  I chose to create a themed banner, to celebrate this special day.


Using the Citrus Bliss 12x12 paper pad, I began cutting out my title "Lucky" using my Silhouette Cameo.  I added machine stitching to each letter with my sewing machine and intentionally left long loose threads hanging to add to the feel of the project.  I backed each letter with dimensional foam squares, and then adhered them onto pre-cut burlap banner pieces.

I chose pieces from the Citrus Bliss ephemera pack, chipboard stickers, foam shapes, and wood veneer shapes to embellish my banner.  I also added frayed flowers from the Bella Rouge collection to couple of my pieces.

I strung my banner with gold thread and clipped it onto a frame using clothespins.  I cut two four leaf clovers with my Silhouette, embellished with tulle and tucked them in behind my banner to finish off the look.  I hope this has inspired you to create more Saint Patrick's Day decor for you home this season!

                                                  Collections used: Citrus BlissBella Rouge and Atlas


Wednesday, February 25, 2015

American Crafts | To Do List

Hello!  I'm popping in today to share a layout that was on the American Crafts blog this week, using the DIY Shop2 collection!

I love the patterns and textures of the DIY Shop 2 collection.  I grouped them together on a layout for a fun look.


Supplies: DIY Shop 2 (369079) - Chalkboard Paper Pad, DIY Shop 2 (369126) - Specialty Surface Large White Dots, DIY Shop 2 (369125) Specialty Surface Gold Glitter Dots, DIY Shop (368004) - Specialty Surface Black Dots, DIY Shop (368008) - Specialty Surface Burlap, DIY Shop 2 (369025) - Gold Foil Dot, DIY Shop 2 (369029) - Dictionary Print, DIY Shop 2 (DIY2SP-69024) - Gold Foil Dots on Black, DIY Shop 2 (39131) - Self Inking Stamp To Do List, DIY Shop 2 (368997) - Paper Straws Gold Dot, DIY Shop 2 (368998) - Paper Straws Gold Chevron, DIY Shop 2 (369038) - Kraft W/ Gold Glitter Tags, DIY Shop 2 (369044) - Circle W/ Gold Glitter Tags, DIY Shop 2 (369049) - Kraft W/ Chalkboard Tags, DIY Shop 2 (369046) - Library Tags, DIY Shop 2 (369047) - Mercantile Tags, DIY Shop 2 (39051) - Gold Glitter Hearts, DIY Shop 2 (369054) - Gold Sequin Ribbon, Cardstock (AC712P12-52) - Neutrals, DIY Shop (366611) - Wooden Buttons, DIY Shop (366633) - Adhesive Badges Chalkboard, DIY Shop (366900) - Mini Stapler, This To That (AM617-13) - Adhesive
 
How To:  
Use a paint brush to flick white paint across Vanilla cardstock paper, set aside to dry.  Use a die cutting machine to cut 9 small file folders out of chalkboard paper, and 3 small file folders out of chalkboard patterned paper.  Use a printer to print 3 small photos and adhere to front of 3 file folders.  Trim small strips of specialty surface burlap paper and adhere to front of 3 file folders.  Line up file folders in a grid design and adhere to Vanilla cardstock background paper.


Thanks for stopping by today!  I hope you enjoyed my layout!


Wednesday, February 18, 2015

American Crafts | XOXO Banner

Celebrate you loved ones or throw a Valentines party in a BIG way by creating a banner set and party favors centered around BIG supplies!


Supplies: DIY Shop 2 (368997) Paper Straws Gold Dot, DIY Shop 2 (368998) Paper Straws Gold Chevron, DIY Shop 2 (369002) - Banner Natural Burlap Pennant, DIY Shop 2 (369005) - Large Clothespins Chalkboard, DIY Shop 2 (369054) - Gold Sequin Ribbon, DIY Shop 2 (370059) - Printed Muslin Bags, DIY Shop 2 (DIYABC-69034) - Alpha Stickers Subway/Black, This To That (AM617-13) - Adhesive, DIY Shop 2 (DIY2SP-69028) -Specialty Cardstock Thin Gold Foil Stripe On White, DIY Shop 2 (DIY2SP-69030) - Specialty Cardstock Thick Gold Foil Stripe On White, DIY Shop 2 (DIY2SP-69031)- Specialty Cardstock Gold Foil Chevron On White, DIY Shop 2 (369125) - Burlap Specialty Surface Gold Glitter Dots, DIY Shop 2 (369126) - Burlap Specialty Surface Large White Dots, DIY Shop 2 (DIY2SP-69024) - Specialty Cardstock Gold Foil Dots On Black, DIY Shop 2 (369029) - Vellum Dictionary Print, DIY Shop 2 (369025) - Vellum Gold Foil Dot,  DIY Shop 2 (369079) - Chalkboard Paper Stack

1.  Start out by gathering your supplies.


2. To create party favors, use scissors or an electronic die cutting machine to trim 20 long banner pieces (each measuring about 1" x 4 1/2") from specialty papers.


3.  Use liquid adhesive to wrap each banner piece around top of straw.


4. To create banner: Trim a piece of sequin ribbon in length, the same with as your burlap pennant pieces.  Use liquid adhesive to adhere to top of each pennant piece.  Affix "X"and "O" letters to each of your pennant pieces.


5. Use scissors or an electronic die cutting machine to cut out large heart from Specialty Gold Foil Cardstock.


6. Create banner by pinning "XOXO" burlap banner pieces and large heart to jute twine (included with burlap banner kit) with large clothespins.  Tuck party favors into muslin bags and place in a tin to add a festive look to your decor and for easy access for parties.


This party set is perfect to celebrate a loved one or to host a love themed party!


I hope that you enjoyed my project today!  Have a good day!


Saturday, January 31, 2015

December Album

Now that the holidays are over I have been working on my December album to document lots of photos and memories that I took during the month of December.   I created my album using Pink Paislee's Merry and Bright Canvas Album kit, cards, papers, ephemera and stickers.


Here is a peek of the front cover.  I kept it simple to really let the sequin star shine.


On page one I used photos of my sweet niece Olivia in front of the Christmas Tree.  I used a brush set from Ali Edwards and printed my photos in black and white.


For page two I used a photo of candles that adorned our Christmas table.  I added some sequins to the bottom right hand pocket, and lots of lovely ephemera pieces.


For page three I used an adorable photo of my nieces Miranda and Olivia in front of the Christmas tree.  I'm so lucky to have such cute subjects to scrap!  I added some Studio Calico wood veneer pieces to the top right hand corner of my page.  


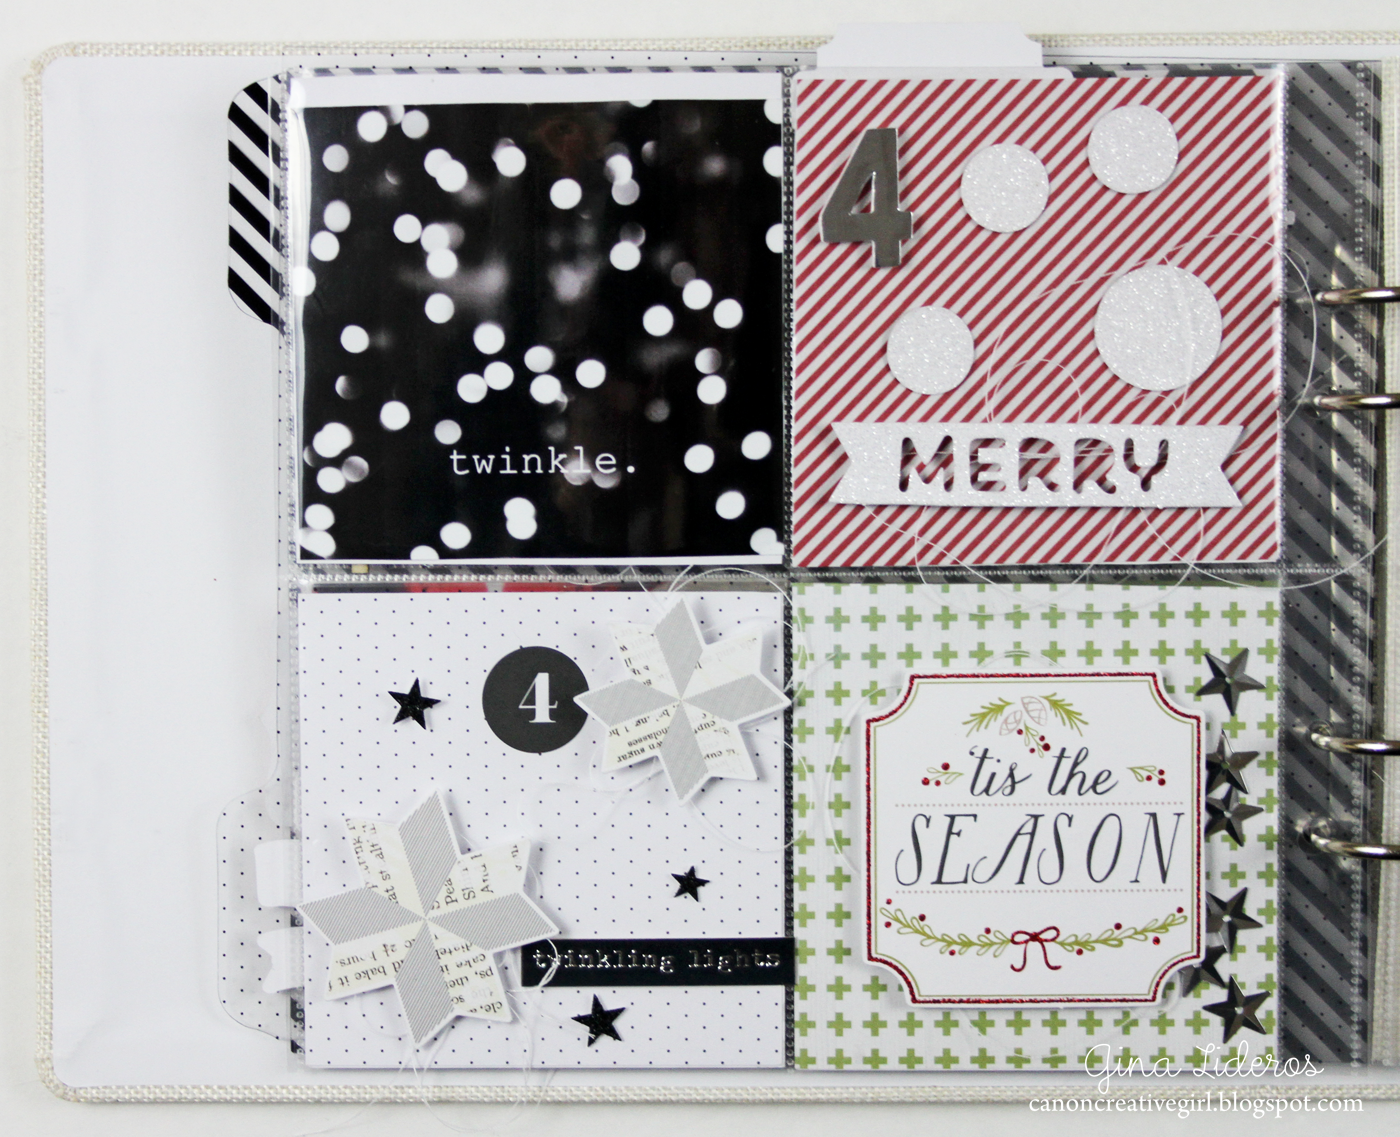
On page four, I took a photo of our tree using a bokeh effect.  I love the look!  I added silver sequin stars to the bottom right hand pocket.


On page five, I used another photo of my sweet niece Olivia in front of the tree with her Santa hat on.  I added some ephemera pieces, thread and glitter stickers.


On page six, I used a photo I snapped of some Christmas ornaments.  I added some star sequins and wood veneer.


For page seven, I used a photo of my kids (Kalee and Matthew) with their cousin Miranda.  I added some wood veneer pieces, a canvas star, and a cute little bow from Pink Paislee.


Throughout the rest of the month I will be working on finishing up the rest of the album.  I will post the final pages here when I complete them.  


Thanks for looking!  


Saturday, January 24, 2015

Bella Rouge Altered Frame

Hi everyone,

I have a fun altered project to share today using the Bella Rouge collection from Pink Paislee.  I love how soft, girly and sweet this collection is!  I decided to make an altered frame display using papers and embellishments from this collection.  I just love how it came out!


I had been wanting a clip on display photo frame for awhile but didn't want to pay for one.  I think it is so much fun to do it yourself.  So, I went to the hardware store and picked up some wire,  and nails.  I found the clips at a local office supply store.  


I strung four wires across the back of the frame.  I didn't measure, I just eyeballed it (which is usually my technique for everything)!

Next, I added about four metal clips to each hanging wire.


 Embellishing it was the fun part!  I used my Silhouette Cameo to cut out envelopes, tags, bows, and arrows.  I even found a sweet little viewfinder and diamond that I cut out that I thought would go perfectly with the Bella Rouge collection!


I embellished each hanging clip with pieces from the ephemera pack, puffy glitter stickers, and chipboard sticker pack.  I added some ribbons, loose thread and bling to dress them up!


I love the way this project came out.  You can bet that you will see more altered frame projects in the future using this DIY frame!