Wednesday, November 19, 2014

American Crafts | Thanksgiving Place Card

Hi everyone,

This week on the American Crafts blog is all about place cards.  Place Cards are such a nice way to add a personal touch to your Thanksgiving day table.  I used sequins, foam tape and a few supplies that I already had on hand to make these one of a kind shaker cards.


Supplies:  DIY Shop (366983) - 6x6 Paper Pad, Christmas (95304) - Mini Clothespins, Autumn Crisp (366533) - Sycamore Photo Overlays, Home Made (732621) - Gold Stickers, Autumn Crisp (366518) - Walnut Lane Paper, This To That (AM617-13) - Dots Adhesive, This To That (AMF617-10) - Foam Tab Adhesive Squares


How To: Trim a piece of DIY shop note paper to 4x6.  Use a corner rounder to round edges.  Adhere Home Made gold stickers.  Use a die cut machine to cut a photo frame from light woodgrain paper.  Adhere Sycamore photo overlay to backside with adhesive.  Adhere foam squares to the back side of photo frame, fill with sequins and adhere to 4x6 card.  Use a punch or die cut machine to cut deer head and small tag from dark woodgrain paper.  Adhere deer head to center of frame using liquid adhesive.  Use a white pen to journal name onto small tag.  String tag with white twine and adhere to frame with mini clothespin.


Wednesday, November 12, 2014

Grateful | American Crafts

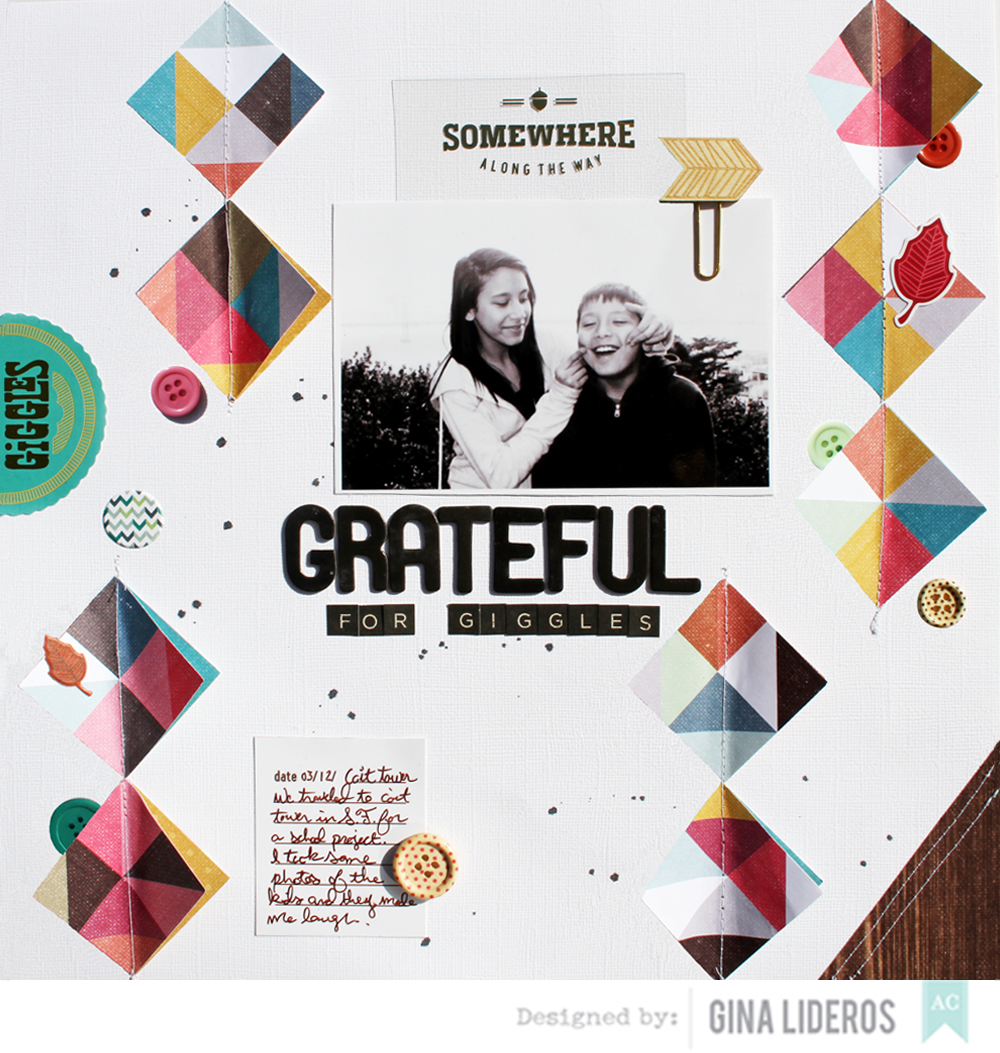
This week is Grateful week on the American Crafts blog.  There are so many things that I am grateful for - but I've got to say at the very top of my list is my kids and the daily love, laughs and giggles that they bring.


Supplies: Autumn Crisp (366516) - Maple Street Paper, Autumn Crisp (366518) - Walnut Lane Paper, Autumn Crisp (366523) - Cedar Lane Paper, Autumn Crisp (366518) - Willow Road Paper, Autumn Crisp (366524) - Poplar Place Paper, Autumn Crisp (366530) - Resin Buttons, Autumn Crisp (366531) - Wooden Buttons Multi, Autumn Crisp (366534) - Wood Veneer Topped Paper Clips, Autumn Crisp (366533) - Photo Overlays, Autumn Crisp (366535) - Remarks Aspen Stickers, Autumn Crisp (366536) - Remarks Oak Matte Puffy Accents, Autumn Crisp (366532) - Cardstock Shapes Foliage, Shimelle (368164) - Letter Stickers, Cardstock (AM710-81) - White, This To That (AM617-13) - Adhesive, Mister Huey's (SC1-31064) - Misting Spray Inky Black, Thickers (732564) - Chalkboard Chipboard Letter Stickers

How to: Drop a few droplets of black spray mist against a white cardstock background, set aside to dry.  Using a punch or die cut machine cut out 18 squares out of pattern paper.  Fold 9 squares in half.  Apply a thin layer of glue down the backside of the folded squares, and layer them onto the unfolded squares.  Use your fingers to curl up the edges of the folded squares to expose the bottom layer.  Adhere layered squares to background using a sewing machine.  Cut a triangle out of woodgrain paper and adhere to bottom right hand side of layout.  Stitch down with a sewing machine.  Adhere photo and photo overlay to top right hand side of layout.  Accent with wood veneer paper clip.  Spell out title "Grateful For Giggles" using thickers and letter stickers.  Journal on journaling card and adhere to bottom left hand side of layout.  Trim "Giggles" die cut in half and adhere to left hand side of layout.  Finish layout by embellishing with buttons and stickers.


Thanks for stopping by today!  I hope you enjoyed my layout!


Monday, November 10, 2014

American Crafts | STITCHED

Hi everyone,

This last week on the American Crafts blog was STITCHED week, and I can't wait to share the projects that I made with you using this brand new collection!


The embellishments and papers from the STITCHED collection were perfect for helping me record this memory of my daughter on the Beach.  I especially love the kraft Thicker words.


Supplies: Stitched (368957) - Continued Paper, Stitched (368953) - Flora Paper, Stitched (368949) - High Profile Paper, Stitched (368945) - Map of My Heart Paper, Stitched (368946) - Woodland, Stitched (368940) - Box Pleat Paper, Stitched (368948) - Thrifted Paper, Stitched (368967) - Thickers Lucky Kraft, Stitched (368970) - Stickers Transparent 6x12 Accent & Phrase, Stitched (368973) - Stickers Fabric Trimmed, Stitched (368974) - Stickers Kraft with Gold Foil Team, Stitched (368978) - Enamel Dots, Stitched (368976) - Embellishments Tags Layered & Stitched, Cardstock (AM71-793) Smooth White, This To That (AM617-13) - Adhesive

How To: Using a water brush watercolor different shades across a white cardstock background.  Using a punch or die cut machine cut several sizes of triangles from various pattern papers.  Arrange in a pattern along the corners of the layout.  Use a sewing machine to stitch down.  Adhere a small photo and stitched layered tag near the center of the layout.  Hand cut the "Don't Quit Your Daydream" quote from Box Pleat paper.  Finish layout by adhering dream thicker and other stickers and sequins.


The Amy Tangerine Embroidery Stencil Kits have always been a go-to item for me.  I couldn't wait to play with this new criss-cross design included in the Oxford Stencil Kit.  It is a new favorite of mine.


Supplies: Stitched (368978) - Embellishments - Enamel Dots, Stitched (368980) - Embellishments - Ephemera, Stitched (368987) - Embroidery Kits - Oxford, Stitched (368984) - Stamps, Acrylic Day Dream, Stitched (368973) - Stickers Fabric Trimmed, Stitched (368972) - Stickers Puffy - With Love, Stitched (368970) - Stickers Transparent - 6x12 Accent & Phrase, Stitched (368966) - Thickers - Foam Accent Today Black, Shimelle (368170) - Roller Date Stamp Day/Month/Year, Cardstock (AM710- 81) - Textured White, Mister Huey's (SC1-31064) Misting Spray Inky Black, DIY Shop (366900) - Mini Stapler

How To: Brush watercolor paints across white cardstock.  Drop droplets of spray mist across page.  Use embroidery kit as a stencil to create criss cross design nine times across the page.  Use a needle and thread to completed criss cross design.  Adhere a small photo to top right hand side of page.  Adhere title across page.  Finish page by adding stickers, die cuts, mini staples and date stamp.


I hope you enjoyed my STITCHED projects, this collection is becoming a new favorite of mine.  I just know that I will be creating with it again very soon!


Saturday, November 8, 2014

Designer's Choice | Scrapbook Circle

Hi everyone!
I have a layout to share with you today that I made using the November 'Little Moments' Kit from Scrapbook Circle.  When I first saw the papers and embellishments included in the November kit, I was so delighted.  This kit is perfect for documenting your Fall photos and memories.  Fall is my favorite season.  I love the warm colors, the cooler weather and of course - all things pumpkin!  I decided to document my love for this Fall favorite on my layout, featuring a simple grid design.

GinaLideros_ThisIsTheLife_SBC

To create my layout I first started by using a punch to punch out 9 squares from pattern paper.  Then I lined them up on my page to create a grid design.  I used the Little Moments Digital Cut Files and the November  Sweetness and Home Sweet Home Add-on's to embellish my page.  I added small photos and digital cuts (yes, no, and maybe) to complete the look.

this is the life sneak

One of my favorite embellishments to play with this month were the  Heidi Swapp Sept Skies Color Magic Resist Die Cuts included in the Sweetness Add-on.  I experimented with different shades and brands of spray mist to personalize them.  I love the way that the resist works and the way they pick up color.  I misted several pieces and then added them to page, along with other fun embellishments from the main kit and add-on kits.

this is the life sneak2

I hope you are inspired by my layout today.  If you create a project with one of  Scrapbook Circle's current kits, we would love to see it.  Be sure to share it with us on Facebook.


Tuesday, November 4, 2014

Page Maps & American Crafts

Hi everyone,

The Design Team from American Crafts teamed up with PageMaps for the month of November!  We were sent some fun Sketches from Becky, and I was really excited to get started.  I paired my Sketch with the new Stitched collection from Amy Tangerine, I just love this collection so much!  Here is what I created with the sketch she sent! 


I stayed pretty close to the sketch and added in some machine stitching, wood veneer frame and some spray mist.  I love that this layout came together fairly quickly by using the map.

Make sure that you stop by the PageMaps site, to see the full post from the design team!


Friday, October 31, 2014

American Crafts | Halloween Cards

Hi everyone,

I hope you are having a great Halloween so far.  I have a couple of Halloween cards to share with you that went up on the American Crafts blog yesterday.

I love the cute die cuts included in the Haunted Hollow collection.  They are perfect for making Halloween cards!
Supplies: Haunted Hollow (368903) - 6x6 Paper Pad, Haunted Hollow (368675) - Die Cut Cardstock Pieces, Haunted Hollow (368676) - Tags, Halloween (97140) - Star Stickers, Halloween (97150) - Clothes Pins, This To That (AM617-13) - Adhesive, This To That (368185) - Adhesive Foam Dots
How to: Cut 4 strips of patterned papers slightly larger than your card. Trim off ends in a banner shape, and adhere to card. Adhere tag to the right side of card. Apply foam stickers to "Happy Halloween" banner title and adhere to center of card overlapping tag. Adhere a clothespin to right side of Halloween banner. Apply cardstock stickers to top left hand side of card. Finish by adhering die cut apothecary jar to bottom left hand side of card.
Supplies: Haunted Hollow (368903) - 6x6 Paper Pad, Haunted Hollow (368675) - Die Cut Cardstock Pieces, Haunted Hollow (368676) - Tags, Halloween (97140) - Star Stickers, Halloween (97150) - Clothes Pins, Haunted Hollow (36860) - Wood Veneers, Halloween (97138) - Decorative Tape, This To That (AM617-13) - Adhesive, This To That (368185) - Adhesive Foam Dots
How to: Cut 4 strips of patterned papers and adhere to card. Cut a strip of decorative tape and adhere to center of card. Adhere tag to right hand side of card. Apply adhesive to wood veneer "Trick or Treat" banner and adhere to die cut label piece. Adhere label to card with foam dots, overlapping tag. Adhere clothespin to right hand side of label. Finish card by adhering bat die cut and star sticker.

Thanks for stopping by!  Have a spooky and safe Halloween!


Wednesday, October 29, 2014

Scrapbook Circle | Designer's Choice

Hi there everyone!  I have a recent layout to share today that I created for Scrapbook Circle using their October On This Day kit and Digital cuts.  When I first opened up my kit I noticed all the bright colors and patterns and wanted to create a layout that was equally as fun.  I had a vision in my mind to create a background out of lots of colorful circles going in a diagonal direction.  So I turned on my Silhouette and picked out this happy cut file (this is actually an older cut file from the shop).  I used the digital file repeatedly by cutting some papers from my main kit.  I also brought in some papers from the October Good Times & Right Now Add On's.

Gina_Lideros_Happy_Oct_SBC

To continue the circle theme I chose two photos of my dogs and trimmed them down to the same size as my other circles.  I used a ruler to line them all up in a diagonal fashion before adhering them down.  Next I used my sewing machine to stitch over them and added a few drops of spray mist.  Then for the fun part!  I added lots of little embellishments to liven up my page.  I love the way the Pinkfresh Studio wood drop stickers and Chickaniddy Crafts enamel stars accent my page.
happyc

I also used the Scrapbook Exclusive stamp set from the main kit to stamp this "oh yeah" phrase on my page.

c
Thanks for stopping by today.  I hope you were inspired by my layout.  Stop by the Scrapbook Circle shop to pick up your October kit today!